 Kubernetes基础
# Kubernetes基础
Kubernetes 是一个 开源的容器编排平台,用于自动化部署、扩展和管理容器化应用。它最早由 Google 开发,后来捐赠给 CNCF(Cloud Native Computing Foundation) 进行维护。
基础命令
kubectl explain pod.spec
kubectl get nodes
kubectl get pod -A
kubectl get pod -n kube-system
kubectl get pod -o wide
kebectl get pod -w
kubectl get pod podName -o yaml
kubectl create -f 1.pod.yaml
kubectl exec -it pod-demo -c myapp-1 -- /bin/bash
kubectl get pod --show-labels
get pod -l app
kubectl logs pod-demo -c myapp-1
kubectl describe pod pod-demo
kubectl delete pod --all
kubectl delete pod podName
kubectl delete svc myservice mydb
kubectl get svc
kubectl scale rc rc-demo --replicas=10
kubectl autoscale deployment nginx-deployment --min=10 --max=15 --cpu-percent=80
kubectl label pod rc-demo-fwdvk version=v1
kubectl diff -f deployment.yaml
kubectl replace -f deployment.yaml
kubectl apply -f deployment.yaml
kubectl create -f deployment.yaml --record
kubectl set image deployment/nginx-deployment nginx-container=wangyanglinux/myapp:v2.0
kubectL create deployment myapp --image=wangyanglinux/myapp:vl.0 --dry-run -o yaml
# 基础架构
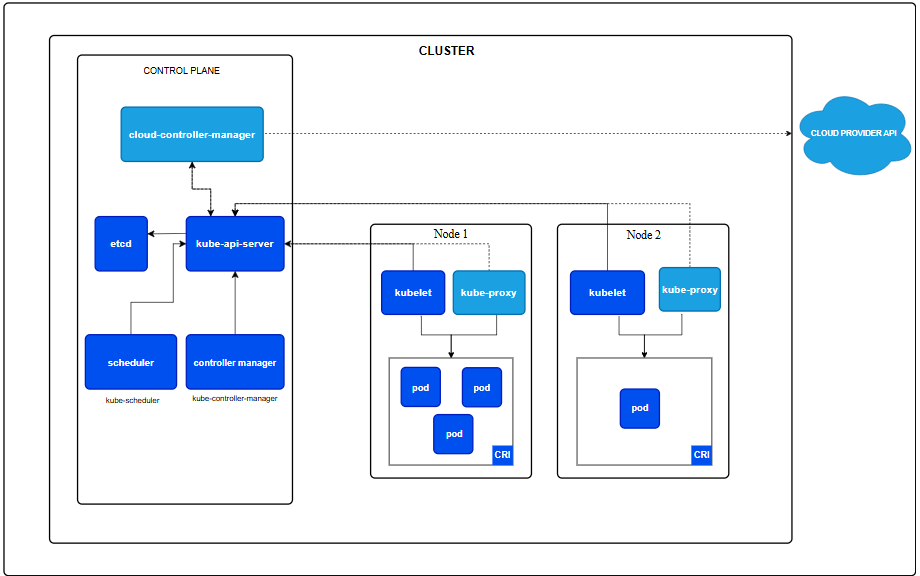
kube-apiserver:提供了资源操作的唯一入口,并提供认证、授权、访问控制、API 注册和发现等机制。
etcd:一致且高可用的键值存储,用作 Kubernetes 所有集群数据的后台数据库。
kube-scheduler:kube-scheduler 是控制平面的组件, 负责监视新创建的、未指定运行节点(node)的 Pods, 并选择节点来让 Pod 在上面运行。
controller manager: 负责维护集群的状态,比如故障检测、自动扩展、滚动更新等。
kubelet:kubelet 会在集群中每个节点(node)上运行。 它保证容器(containers)都运行在 Pod 中。kubelet 接收一组通过各类机制提供给它的 PodSpec,确保这些 PodSpec 中描述的容器处于运行状态且健康。 kubelet 不会管理不是由 Kubernetes 创建的容器。
kube-proxy 负责为 Service 提供 cluster 内部的服务发现和负载均衡。
CRI(容器运行时):这个基础组件使 Kubernetes 能够有效运行容器。 它负责管理 Kubernetes 环境中容器的执行和生命周期。
Ingress Controller 为服务提供外网入口。
cloud-controller-manager:
cloud provider api:
# 安装部署
# docker安装
bash <(curl -Ls https://raw.githubusercontent.com/zsan1229/install_docker/main/install_docker.sh)
# cri-docker安装
wget https://github.com/Mirantis/cri-dockerd/releases/download/v0.3.17/cri-dockerd_0.3.17.3-0.debian-bookworm_amd64.deb
dpkg -i cri-dockerd_0.3.17.3-0.debian-bookworm_amd64.deb
systemctl enable cri-docker.service  #设置开机自启
systemctl status cri-docker.service  #查看运行状态
2
3
4
# kubectl安装
curl -LO https://dl.k8s.io/release/v1.32.0/bin/linux/amd64/kubectl
# 验证安装
curl -LO "https://dl.k8s.io/release/v1.32.0/bin/linux/amd64/kubectl.sha256"
echo "$(cat kubectl.sha256)  kubectl" | sha256sum --check
2
3
4
验证用过应该输出
kubectl: OK
验证失败时,sha256 将以非零值退出,并打印如下输出:
注意:下载的 kubectl 与校验和文件版本必须相同。
kubectl: FAILED
sha256sum: WARNING: 1 computed checksum did NOT match
2
install -o root -g root -m 0755 kubectl /usr/local/bin/kubectl   #安装kubectl
kubectl version --client  #验证安装
2
正常应输出
Client Version: v1.32.0
Kustomize Version: v5.5.0
2
其它安装方式可以参考官网:kubectl (opens new window)
# kubeadm、kubelet、kubectl安装
更新 apt 包索引并安装使用 Kubernetes apt 仓库所需要的包:
sudo apt-get update
# apt-transport-https 可能是一个虚拟包(dummy package);如果是的话,你可以跳过安装这个包
sudo apt-get install -y apt-transport-https ca-certificates curl gpg
2
3
下载用于 Kubernetes 软件包仓库的公共签名密钥。所有仓库都使用相同的签名密钥,因此你可以忽略URL中的版本:
# 如果 `/etc/apt/keyrings` 目录不存在,则应在 curl 命令之前创建它,请阅读下面的注释。
# sudo mkdir -p -m 755 /etc/apt/keyrings
curl -fsSL https://pkgs.k8s.io/core:/stable:/v1.32/deb/Release.key | sudo gpg --dearmor -o /etc/apt/keyrings/kubernetes-apt-keyring.gpg
2
3
添加 Kubernetes apt 仓库。 请注意,此仓库仅包含适用于 Kubernetes 1.32 的软件包; 对于其他 Kubernetes 次要版本,则需要更改 URL 中的 Kubernetes 次要版本以匹配你所需的次要版本:
# 此操作会覆盖 /etc/apt/sources.list.d/kubernetes.list 中现存的所有配置。
echo 'deb [signed-by=/etc/apt/keyrings/kubernetes-apt-keyring.gpg] https://pkgs.k8s.io/core:/stable:/v1.32/deb/ /' | sudo tee /etc/apt/sources.list.d/kubernetes.list
2
更新 apt 包索引,安装 kubelet、kubeadm 和 kubectl,并锁定其版本:
sudo apt-get update
sudo apt-get install -y kubelet kubeadm kubectl
sudo apt-mark hold kubelet kubeadm kubectl
2
3
# 集群初始化
kubeadm init \
  --pod-network-cidr=10.244.0.0/16 \
  --cri-socket=unix:///var/run/cri-dockerd.sock \
  --apiserver-advertise-address=66.235.170.12
2
3
4
Your Kubernetes control-plane has initialized successfully!

To start using your cluster, you need to run the following as a regular user:

  mkdir -p $HOME/.kube
  sudo cp -i /etc/kubernetes/admin.conf $HOME/.kube/config
  sudo chown $(id -u):$(id -g) $HOME/.kube/config

Alternatively, if you are the root user, you can run:

  export KUBECONFIG=/etc/kubernetes/admin.conf

You should now deploy a pod network to the cluster.
Run "kubectl apply -f [podnetwork].yaml" with one of the options listed at:
  https://kubernetes.io/docs/concepts/cluster-administration/addons/

Then you can join any number of worker nodes by running the following on each as root:

kubeadm join 66.235.170.12:6443 --token umr6tq.as8w3qu1p4kwjo3o \
        --discovery-token-ca-cert-hash sha256:88ef3e471f3e01391f139b4163b1ccc7885cc550f158358174f6029110918ec2
2
3
4
5
6
7
8
9
10
11
12
13
14
15
16
17
18
19
20
# 加入集群node身份 加上--v=5查看日志
sudo kubeadm join 66.235.170.12:6443 --token aajxe3.d8d5m5o1yvbr5hde \
    --discovery-token-ca-cert-hash sha256:88ef3e471f3e01391f139b4163b1ccc7885cc550f158358174f6029110918ec2 \
    --cri-socket unix:///var/run/cri-dockerd.sock
2
3
4

# 重新生成token,如果token过期,控制节点上生成
kubeadm token create --print-join-command
2

# 部署网络插件
kebectl get nodes
NAME     STATUS     ROLES           AGE     VERSION
node01   NotReady   control-plane   5m26s   v1.32.8
2
这是因为没有部署网络插件造成的。
部署Calico
wget --no-check-certificate https://raw.githubusercontent.com/projectcalico/calico/v3.26.1/manifests/calico.yaml
ip addr list  # 查看自己的网卡
2
vim calico.yaml
插入下面一段
-----
- name: CALICO_IPV4POOL_CIDR
  value: "10.244.0.0/16"
- name: IP_AUTODETECTION_METHOD
  value: "interface=ens160"

-----
ens160替换为自己的网卡
10.244.0.0/16 替换为自己init的网段
2
3
4
5
6
7
8
9
10
11
            # The default IPv4 pool to create on startup if none exists. Pod IPs will be
            # chosen from this range. Changing this value after installation will have
            # no effect. This should fall within `--cluster-cidr`.
            # - name: CALICO_IPV4POOL_CIDR
            #   value: "192.168.0.0/16"
            - name: CALICO_IPV4POOL_CIDR
              value: "10.244.0.0/16"
            - name: IP_AUTODETECTION_METHOD
              value: "interface=ens17"
            # Disable file logging so `kubectl logs` works.
            - name: CALICO_DISABLE_FILE_LOGGING
              value: "true"
2
3
4
5
6
7
8
9
10
11
12
kubectl apply -f calico.yaml
等待一会
kubectl get nodes
kubectl get pods --all-namespaces
2
NAME     STATUS   ROLES           AGE     VERSION
node01   Ready    control-plane   5m57s   v1.32.8

NAMESPACE     NAME                                       READY   STATUS    RESTARTS   AGE
kube-system   calico-kube-controllers-689744956f-tk5mc   1/1     Running   0          7m11s
kube-system   calico-node-dv75k                          1/1     Running   0          7m11s
kube-system   coredns-668d6bf9bc-bj62x                   1/1     Running   0          61m
kube-system   coredns-668d6bf9bc-qdfjs                   1/1     Running   0          61m
kube-system   etcd-node01                                1/1     Running   0          61m
kube-system   kube-apiserver-node01                      1/1     Running   0          61m
kube-system   kube-controller-manager-node01             1/1     Running   0          61m
kube-system   kube-proxy-sd8gr                           1/1     Running   0          61m
kube-system   kube-scheduler-node01                      1/1     Running   0          61m
2
3
4
5
6
7
8
9
10
11
12
13
# 清理
# pod
Pod 是 Kubernetes 中最小的可部署单元。
它本质上是对 一个或多个容器 的抽象封装,这些容器共享 网络、存储 和 运行环境。
poddemo
apiVersion:接口组/版本
kind:类别
metadata:元数据
spec: 期望状态
status: 无需人为编写,由k8s集群生成
apiVersion: v1
kind: Pod
metadata:
    name: pod-demo
    namespace: default
    labels:
        app: myapp
spec:
    containers:
    - name: myapp-1
      image: wangyanglinux/myapp:v1.0
    - name: busybox-1
      image: wangyanglinux/tools:busybox
      command:
        - "/bin/sh"
        - "-c"
        - "sleep 3600"
2
3
4
5
6
7
8
9
10
11
12
13
14
15
16
17
pod生命周期
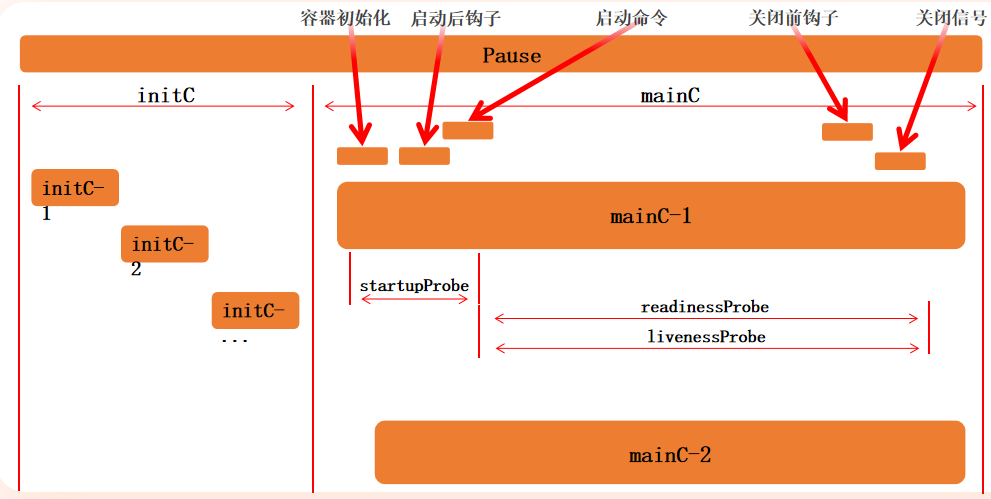
# initC
init 容器总是运行到成功完成为止
每个 init 容器都必须在下一个 init 容器启动之前成功完成
检测initC的阻塞性
apiVersion: v1
kind: Pod
metadata:
 name: initc-1
 labels:
   app: initc
spec:
 containers:
 - name: myapp-container
   image: wangyanglinux/tools:busybox
   command: ['sh', '-c', 'echo The app is running! && sleep 3600']
 initContainers:
 - name: init-myservice
   image: wangyanglinux/tools:busybox
   command: ['sh', '-c', 'until nslookup myservice; do echo waiting for myservice; sleep 2; done;']
 - name: init-mydb
   image: wangyanglinux/tools:busybox
   command: ['sh', '-c', 'until nslookup mydb; do echo waiting for mydb; sleep 2; done;']
2
3
4
5
6
7
8
9
10
11
12
13
14
15
16
17
18
$ kubectl create svc clusterip myservice --tcp=80:80
$ kubectl create svc clusterip mydb --tcp=80:80
2
检查 initC 的执行成功
apiVersion: v1
kind: Pod
metadata:
 name: myapp-pod
 labels:
   app: myapp
spec:
 containers:
 - name: myapp
   image: wangyanglinux/myapp:v1.0
 initContainers:
 - name: randexit
   image: wangyanglinux/tools:randexitv1
   args: ["--exitcode=1"]
2
3
4
5
6
7
8
9
10
11
12
13
14
探针
探针是由 kubelet 对容器执行的定期诊断。要执行诊断,kubelet 调用由容器实现的 Handler。有三种类型的处理程序:
ExecAction:在容器内执行指定命令。如果命令退出时返回码为 0 则认为诊断成功
TCPSocketAction:对指定端口上的容器的 IP 地址进行 TCP 检查。如果端口打开,则诊断被认为是成功的
HTTPGetAction:对指定的端口和路径上的容器的 IP 地址执行 HTTP Get 请求。如果响应的状态码大于等于200 且小于 400,则诊断被认为是成功的
每次探测都将获得以下三种结果之一:
成功:容器通过了诊断。
失败:容器未通过诊断。
未知:诊断失败,因此不会采取任何行动
三种健康检查探针类型:
startupProbe(启动探针)
用途:检查容器是否已经成功启动
特点:在容器启动阶段执行,成功后不再执行
- initialDelaySeconds:容器启动后要等待多少秒后就探针开始工作,单位"秒",默认是 0 秒,最小值是 0
- periodSeconds:执行探测的时间间隔(单位是秒),默认为 10s,单位"秒",最小值是 1
- timeoutSeconds:探针执行检测请求后,等待响应的超时时间,默认为 1s,单位"秒",最小值是 1
- successThreshold:探针检测失败后认为成功的最小连接成功次数,默认值为 1。必须为 1 才能激活和启动。最小值为1。
- failureThreshold:探测失败的重试次数,重试一定次数后将认为失败,默认值为 3,最小值为 1。
apiVersion: v1
kind: Pod
metadata:
 name: startupprobe-1
 namespace: default
spec:
 containers:
 - name: myapp-container
   image: wangyanglinux/myapp:v1.0
   imagePullPolicy: IfNotPresent
   ports:
   - name: http
     containerPort: 80
   readinessProbe:
     httpGet:
       port: 80
       path: /index2.html
     initialDelaySeconds: 1
     periodSeconds: 3
   startupProbe:
     httpGet:
       path: /index1.html
       port: 80
     failureThreshold: 30
     periodSeconds: 10
2
3
4
5
6
7
8
9
10
11
12
13
14
15
16
17
18
19
20
21
22
23
24
25
livenessProbe(存活探针)
用途:检查容器是否还在正常运行
特点:在整个容器生命周期内定期执行
- initialDelaySeconds:容器启动后要等待多少秒后就探针开始工作,单位"秒",默认是 0 秒,最小值是 0
- periodSeconds:执行探测的时间间隔(单位是秒),默认为 10s,单位"秒",最小值是 1
- timeoutSeconds:探针执行检测请求后,等待响应的超时时间,默认为 1s,单位"秒",最小值是 1
- successThreshold:探针检测失败后认为成功的最小连接成功次数,默认值为 1。必须为 1 才能激活和启动。最小值为1。
- failureThreshold:探测失败的重试次数,重试一定次数后将认为失败,默认值为 3,最小值为 1。
基于 Exec 方式
apiVersion: v1
kind: Pod
metadata:
 name: liveness-exec-pod
 namespace: default
spec:
 containers:
 - name: liveness-exec-container
   image: wangyanglinux/tools:busybox
   imagePullPolicy: IfNotPresent
   command: ["/bin/sh","-c","touch /tmp/live ; sleep 60; rm -rf /tmp/live; sleep3600"]
   livenessProbe:
     exec:
       command: ["test","-e","/tmp/live"]
     initialDelaySeconds: 1
     periodSeconds: 3
2
3
4
5
6
7
8
9
10
11
12
13
14
15
16
基于 HTTP Get 方式
apiVersion: v1
kind: Pod
metadata:
 name: liveness-httpget-pod
 namespace: default
spec:
 containers:
 - name: liveness-httpget-container
   image: wangyanglinux/myapp:v1.0
   imagePullPolicy: IfNotPresent
   ports:
   - name: http
     containerPort: 80
   livenessProbe:
     httpGet:
       port: 80
       path: /index.html
     initialDelaySeconds: 1
     periodSeconds: 3
     timeoutSeconds: 3
2
3
4
5
6
7
8
9
10
11
12
13
14
15
16
17
18
19
20
基于 TCP Check 方式
apiVersion: v1
kind: Pod
metadata:
 name: liveness-tcp-pod
spec:
 containers:
 - name: liveness-tcp-container
   image: wangyanglinux/myapp:v1.0
   livenessProbe:
     initialDelaySeconds: 5
     timeoutSeconds: 1
     tcpSocket:
       port: 80
2
3
4
5
6
7
8
9
10
11
12
13
readinessProbe(就绪探针)
用途:检查容器是否准备好接收流量
特点:定期检查容器的就绪状态
initialDelaySeconds:容器启动后要等待多少秒后就探针开始工作,单位"秒",默认是 0 秒,最小值是 0
periodSeconds:执行探测的时间间隔(单位是秒),默认为 10s,单位"秒",最小值是 1
timeoutSeconds:探针执行检测请求后,等待响应的超时时间,默认为 1s,单位"秒",最小值是 1
successThreshold:探针检测失败后认为成功的最小连接成功次数,默认值为 1。必须为 1 才能激活和启动。最小值为1。
failureThreshold:探测失败的重试次数,重试一定次数后将认为失败,默认值为 3,最小值为 1。
基于 HTTP Get 方式
apiVersion: v1
kind: Pod
metadata:
 name: readiness-httpget-pod
 namespace: default
 labels:
   app: myapp
   env: test
spec:
 containers:
 - name: readiness-httpget-container
   image: wangyanglinux/myapp:v1.0
   imagePullPolicy: IfNotPresent
   readinessProbe:
     httpGet:
       port: 80
       path: /index1.html
     initialDelaySeconds: 1
     periodSeconds: 3
2
3
4
5
6
7
8
9
10
11
12
13
14
15
16
17
18
19
基于 EXEC 方式
apiVersion: v1
kind: Pod
metadata:
 name: readiness-exec-pod
 namespace: default
spec:
 containers:
 - name: readiness-exec-container
   image: wangyanglinux/tools:busybox
   imagePullPolicy: IfNotPresent
   command: ["/bin/sh","-c","touch /tmp/live ; sleep 60; rm -rf /tmp/live; sleep3600"]
   readinessProbe:
     exec:
       command: ["test","-e","/tmp/live"]
     initialDelaySeconds: 1
     periodSeconds: 3
2
3
4
5
6
7
8
9
10
11
12
13
14
15
16
基于 TCP Check 方式
apiVersion: v1
kind: Pod
metadata:
 name: readiness-tcp-pod
spec:
 containers:
 - name: readiness-exec-container
   image: wangyanglinux/myapp:v1.0
   readinessProbe:
     initialDelaySeconds: 5
     timeoutSeconds: 1
     tcpSocket:
       port: 80
2
3
4
5
6
7
8
9
10
11
12
13
# 钩子
Pod hook(钩子)是由 Kubernetes 管理的 kubelet 发起的,当容器中的进程启动前或者容器中的进程终止之前运行,这是包含在容器的生命周期之中。可以同时为 Pod 中的所有容器都配置 hook。
Hook 的类型包括两种:
exec: 执行一段命令
HTTP: 发送 HTTP 请求
exec
apiVersion: v1
kind: Pod
metadata:
 name: lifecycle-exec-pod
spec:
 containers:
 - name: lifecycle-exec-container
   image: wangyanglinux/myapp:v1
   lifecycle:
     postStart:
       exec:
         command: ["/bin/sh", "-c", "echo postStart > /usr/share/message"]
     preStop:
       exec:
         command: ["/bin/sh", "-c", "echo preStop > /usr/share/message"]
2
3
4
5
6
7
8
9
10
11
12
13
14
15
基于 HTTP Get 方式
# 开启一个测试 webServer
$ docker run -it --rm -p 1234:80 wangyanglinux/myapp:v1.0
2
apiVersion: v1
kind: Pod
metadata:
 name: lifecycle-httpget-pod
 labels:
   name: lifecycle-httpget-pod
spec:
 containers:
 - name: lifecycle-httpget-container
   image: wangyanglinux/myapp:v1.0
   ports:
     - containerPort: 80
   lifecycle:
     postStart:
       httpGet:
         host: 66.235.170.12
         path: index.html
         port: 1234
     preStop:
       httpGet:
         host: 66.235.170.12
         path: hostname.html
         port: 1234
2
3
4
5
6
7
8
9
10
11
12
13
14
15
16
17
18
19
20
21
22
23
练习
apiVersion: v1
kind: Pod
metadata:
 name: lifecycle-pod
 labels:
   app: lifecycle-pod
spec:
 containers:
 - name: busybox-container
   image: wangyanglinux/tools:busybox
   command: ["/bin/sh","-c","touch /tmp/live ; sleep 600; rm -rf /tmp/live; sleep3600"]
   livenessProbe:
     exec:
       command: ["test","-e","/tmp/live"]
     initialDelaySeconds: 1
     periodSeconds: 3
   lifecycle:
     postStart:
       httpGet:
         host: 66.235.170.12
         path: index.html
         port: 1234
     preStop:
       httpGet:
         host: 66.235.170.12
         path: hostname.html
         port: 1234
 - name: myapp-container
   image: wangyanglinux/myapp:v1.0
   livenessProbe:
     httpGet:
       port: 80
       path: /index.html
     initialDelaySeconds: 1
     periodSeconds: 3
     timeoutSeconds: 3
   readinessProbe:
     httpGet:
       port: 80
       path: /index1.html
     initialDelaySeconds: 1
     periodSeconds: 3
 initContainers:
 - name: init-myservice
   image: wangyanglinux/tools:busybox
   command: ['sh', '-c', 'until nslookup myservice; do echo waiting for myservice; sleep 2; done;']
 - name: init-mydb
   image: wangyanglinux/tools:busybox
   command: ['sh', '-c', 'until nslookup mydb; do echo waiting for mydb; sleep 2; done;']
2
3
4
5
6
7
8
9
10
11
12
13
14
15
16
17
18
19
20
21
22
23
24
25
26
27
28
29
30
31
32
33
34
35
36
37
38
39
40
41
42
43
44
45
46
47
48
49
# pod控制器
在 Kubernetes 中运行了一系列控制器来确保集群的当前状态与期望状态保持一致,它们就是 Kubernetes 集群内部的管理控制中心或者说是"中心大脑"。例如,ReplicaSet 控制器负责维护集群中运行的 Pod 数量;Node 控制器负责监控节点的状态,并在节点出现故障时,执行自动化修复流程,确保集群始终处于预期的工作状态。
# ReplicationController
ReplicationController(RC)用来确保容器应用的副本数始终保持在用户定义的副本数,即如果有容器异常退出,会自动创建新的 Pod 来替代;而如果异常多出来的容器也会自动回收;
在新版本的 Kubernetes 中建议使用 ReplicaSet 来取代 ReplicationController。ReplicaSet 跟 ReplicationController 没有本质的不同,只是名字不一样,并且 ReplicaSet 支持集合式的 selector;
- 确保 Pod 副本数量始终符合用户定义
- 自动替换异常退出的 Pod
- 自动回收多余的 Pod(先回收创建时间较短的)
标签的匹配只要pod的标签包含控制器的所有标签即可(一般情况下)
apiVersion: v1
kind: ReplicationController
metadata:
 name: rc-demo
spec:
 replicas: 3
 selector:
   app: rc-demo
 template:
   metadata:
     labels:
       app: rc-demo
   spec:
     containers:
     - name: rc-demo-container
       image: wangyanglinux/myapp:v1.0
       env:
       - name: GET_HOSTS_FROM
         value: dns
         name: zhangsan
         value: "123"
       ports:
       - containerPort: 80
2
3
4
5
6
7
8
9
10
11
12
13
14
15
16
17
18
19
20
21
22
23
# ReplicaSet
apiVersion: apps/v1
kind: ReplicaSet
metadata:
 name: rs-ml-demo
spec:
 replicas: 3
 selector:
   matchLabels:
     app: rs-ml-demo
 template:
   metadata:
     labels:
       app: rs-ml-demo
   spec:
     containers:
     - name: rs-ml-demo-container
       image: wangyanglinux/myapp:v1.0
       env:
       - name: GET_HOSTS_FROM
         value: dns
       ports:
       - containerPort: 80
2
3
4
5
6
7
8
9
10
11
12
13
14
15
16
17
18
19
20
21
22
selector.matchExpressions rs 在标签选择器上,除了可以定义键值对的选择形式,还支持 matchExpressions 字段,可以提供多种 选择。 目前支持的操作包括:
- In:label 的值在某个列表中
- NotIn:label 的值不在某个列表中
- Exists:某个 label 存在
- DoesNotExist:某个 label 不存在
apiVersion: apps/v1
kind: ReplicaSet
metadata:
 name: rs-me-exists-demo
spec:
 selector:
   matchExpressions:
     - key: app
       operator: Exists
 template:
   metadata:
     labels:
       app: spring-k8s
   spec:
     containers:
       - name: rs-me-exists-demo-container
         image: wangyanglinux/myapp:v1.0
         ports:
           - containerPort: 80
2
3
4
5
6
7
8
9
10
11
12
13
14
15
16
17
18
19
apiVersion: apps/v1
kind: ReplicaSet
metadata:
 name: rs-me-in-demo
spec:
 selector:
   matchExpressions:
     - key: app
       operator: In
       values:
       - spring-k8s
       - hahahah
 template:
   metadata:
     labels:
       app: sg-k8s
   spec:
     containers:
       - name: rs-me-in-demo-container
         image: wangyanglinux/myapp:v1.0
         ports:
           - containerPort: 80
2
3
4
5
6
7
8
9
10
11
12
13
14
15
16
17
18
19
20
21
22
# Deployment
Deployment 为 Pod 和 ReplicaSet 提供了一个声明式定义(declarative)方法,用来替代以前的 ReplicationController 来方便的管理应用。典型的应用场景包括:
- 定义 Deployment 来创建 Pod 和 ReplicaSet
- 滚动升级和回滚应用
- 扩容和缩容
- 暂停和继续 Deployment
声明性的东西是对终结果的陈述,表明意图而不是实现它的过程。在 Kubernetes 中,这就是说"应该有一个包含三个 Pod 的 ReplicaSet"。
命令式充当命令。声明式是被动的,而命令式是主动且直接的:"创建一个包含三个 Pod 的 ReplicaSet"。
# replace和apply 区别
kubectl replace: 使用新的配置完全替换掉现有资源的配置。这意味着新配置将覆盖现有资源的所有字段和属性,包括未指定的字段,会导致整个资源的替换 kubectl apply: 使用新的配置部分地更新现有资源的配置。它会根据提供的配置文件或参数(只会更新配置文件声明的部分,配置文件未声明的不会更新),只更新与新配置中不同的部分,而不会覆盖整个资源的配置字段级别的更新
kubectl replace: 由于是完全替换,所以会覆盖所有字段和属性,无论是否在新配置中指定 kubectl apply: 只更新与新配置中不同的字段和属性,保留未指定的字段不受影响
kubectl replace: 不支持部分更新,它会替换整个资源的配置 kubectl apply: 支持部分更新,只会更新新配置中发生变化的部分,保留未指定的部分不受影响与其他配置的影响
kubectl replace: 不考虑其他资源配置的状态,直接替换资源的配置 kubectl apply: 可以结合使用 -f 或 -k 参数,从文件目录中读取多个资源配置,并根据当前集群中的资源状态进行更新
apiVersion: apps/v1
kind: Deployment
metadata:
 labels:
   app: myapp-deploy
 name: myapp-deploy
spec:
 replicas: 1
 selector:
   matchLabels:
     app: myapp-deploy
 template:
   metadata:
     labels:
       app: myapp-deploy
   spec:
     containers:
     - image: wangyanglinux/myapp:v1.0
       name: myapp
2
3
4
5
6
7
8
9
10
11
12
13
14
15
16
17
18
19
apiVersion: apps/v1
kind: Deployment
metadata:
 labels:
   app: deployment-demo
 name: deployment-demo
spec:
 replicas: 5
 selector:
   matchLabels:
     app: deployment-demo
 template:
   metadata:
     labels:
       app: deployment-demo
   spec:
     containers:
     - image: wangyanglinux/myapp:v1.0
       name: deployment-demo-container
2
3
4
5
6
7
8
9
10
11
12
13
14
15
16
17
18
19
# 更新策略
Deployment 可以保证在升级时只有一定数量的 Pod 是 down 的。默认的,它会确保至少有比期望的Pod数量少一个是up状态(最多一个不可用)
Deployment 同时也可以确保只创建出超过期望数量的一定数量的 Pod。默认的,它会确保最多比期望的 Pod 数量多一个的 Pod 是 up 的(最多 1 个 surge )
kubectl explain deploy.spec.strategy.type
- Recreate
- rollingUpdate
maxSurge: 指定超出副本数有几个,两种方式:1、指定数量 2、百分比
maxUnavailable: 最多有几个不可用
金丝雀部署
kubectl apply -f 2.deployment.yaml
kubectl create svc clusterip  deployment-demo --tcp=80:80
kubectl patch deployment deployment-demo -p '{"spec":{"strategy":{"rollingUpdate":{"maxSurge":1,"maxUnavailable":0}}}}'
# 这个时候会有11个pod 暂停滚动部署更新
kubectl patch deployment deployment-demo --patch '{"spec": {"template": {"spec": {"containers": [{"name": "deployment-demo-container","image":"wangyanglinux/myapp:v2.0"}]}}}}' && kubectl rollout pause deploy deployment-demo
# 恢复部署更新
kubectl rollout resume deploy deployment-demo
2
3
4
5
6
7
以上命令建议使用一下命令观察情况
while true; do curl 10.105.187.100; done
回滚命令
# 查看滚动更新状态
kubectl rollout status deployment deployment-demo
echo $?  # 查看上一条命令的退出状态码
2
3
# 查看更新历史
kubectl rollout history deployment/deployment-demo
2
kubectl create -f deployment.yaml --record
# 回滚到指定版本
kubectl rollout undo deployment/deployment-demo --to-revision=2
2
# 暂停滚动更新
kubectl rollout pause deployment/deployment-demo
2
# DaemonSet
DaemonSet 确保全部(或者一些-除了master节点)Node 上运行一个 Pod 的副本。当有 Node 加入集群时也会为他们新增一个 Pod 。当有 Node 从集群移除时,这些 Pod 也会被回收。删除 DaemonSet 将会删除它创建的所有 Pod。
不会在master创建的原因是:master的污点(Taints)
kubectl describe node node01
Taints:             node-role.kubernetes.io/control-plane:NoSchedule
                    # 或者
                    node-role.kubernetes.io/master:NoSchedule
2
3
使用 DaemonSet 的一些典型用法:
- 运行集群存储 daemon,例如在每个 Node 上运行 glusterd、ceph
- 在每个 Node 上运行日志收集 daemon,例如 fluentd、logstash
- 在每个 Node 上运行监控 daemon,例如 Prometheus Node Exporter、collectd、Datadog 代理、New Relic 代理,或 Ganglia gmond
apiVersion: apps/v1
kind: DaemonSet
metadata:
  name: deamonset-demo
  labels:
    app: daemonset-demo
spec:
  selector:
    matchLabels:
      name: deamonset-demo
  template:
    metadata:
      labels:
        name: deamonset-demo
    spec:
      containers:
      - name: daemonset-demo-container
        image: wangyanglinux/myapp:v1.0
2
3
4
5
6
7
8
9
10
11
12
13
14
15
16
17
18
# job
Job 负责批处理任务,即仅执行一次的任务,它保证批处理任务的一个或多个 Pod 成功结束
特殊说明
- spec.template 格式同 Pod
- RestartPolicy 仅支持 Never 或 OnFailure
- 单个 Pod 时,默认 Pod 成功运行后 Job 即结束
- spec.completions 标志 Job 结束需要成功运行的 Pod 个数,默认为 1
- spec.parallelism 标志并行运行的 Pod 的个数,默认为 1
- spec.activeDeadlineSeconds 标志失败 Pod 的重试最大时间,超过这个时间不会继续重试
- spec.backoffLimit 标志pod可以失败的次数,即同一个 Pod 模板失败超过 6 次(默认6次),Job 就会认为彻底失败,直接进入 Failed 状态,不再继续创建新的 Pod。
apiVersion: batch/v1
kind: Job
metadata:
 name: job-demo
spec:
 template:
   metadata:
     name: job-demo-pod
   spec:
     containers:
     - name: job-demo-container
       image: wangyanglinux/tools:maqingpythonv1
     restartPolicy: Never
2
3
4
5
6
7
8
9
10
11
12
13
控制为 1 的错误返回码
apiVersion: batch/v1
kind: Job
metadata:
 name: rand
spec:
 template:
   metadata:
     name: rand
   spec:
     containers:
     - name: rand
       image: wangyanglinux/tools:randexitv1
       args: ["--exitcode=1"]
     restartPolicy: Never
2
3
4
5
6
7
8
9
10
11
12
13
14
随机生成返回码
apiVersion: batch/v1
kind: Job
metadata:
  name: rand
spec:
  completions: 10
  parallelism: 5
  template:
    metadata:
      name: rand
    spec:
      containers:
        - name: rand
          image: wangyanglinux/tools:randexitv1
      restartPolicy: Never
2
3
4
5
6
7
8
9
10
11
12
13
14
15
# cronjob
Cron Job 管理基于时间的 Job,即: 在给定时间点只运行一次 周期性地在给定时间点运行
典型的用法如下所示: 在给定的时间点调度 Job 运行 创建周期性运行的 Job,例如:数据库备份、发送邮件
- spec.schedule:调度,必需字段,指定任务运行周期,格式同 Cron
- spec.jobTemplate:Job 模板,必需字段,指定需要运行的任务,格式同 Job
- spec.startingDeadlineSeconds:启动 Job 的期限(秒级别),该字段是可选的。如果因为任何原因而错过了被调度的时间,那么错过执行时间的 Job 将被认为是失败的。如果没有指定,则没有期限
- spec.concurrencyPolicy:并发策略,该字段也是可选的。它指定了如何处理被 Cron Job 创建的 Job 的并发执行。只允许指定下面策略中的一种:
Allow(默认):允许并发运行 Job
Forbid:禁止并发运行,如果前一个还没有完成,则直接跳过下一个
Replace:取消当前正在运行的 Job,用一个新的来替换 注意,当前策略只能应用于同一个 Cron Job 创建的 Job。如果存在多个 Cron Job,它们创建的 Job 之间总是允许并发运行。
spec.suspend :挂起,该字段也是可选的。如果设置为 true ,后续所有执行都会被挂起。它对已经开始执行的 Job 不起作用。默认值为 false
spec.successfulJobsHistoryLimit 和 .spec.failedJobsHistoryLimit :历史限制,是可选的字段。它们指定了可以保留多少完成和失败的 Job。默认情况下,它们分别设置为 3 和 1 。设置限制的值为 0 ,相关类型的 Job 完成后将不会被保留
apiVersion: batch/v1
kind: CronJob
metadata:
  name: cronjob-demo
spec:
  schedule: "*/1 * * * *"
  jobTemplate:
    spec:
      completions: 3
      template:
        spec:
          containers:
            - name: cronjob-demo-container
              image: busybox
              args:
                - /bin/sh
                - -c
                - date; echo Hello from the Kubernetes cluster
          restartPolicy: OnFailure
2
3
4
5
6
7
8
9
10
11
12
13
14
15
16
17
18
19
# Service
在 Kubernetes 集群中,每个 Node 运行一个 kube-proxy 进程。 kube-proxy 负责为 Service 实现了一种 VIP(虚拟 IP)的形式
在 Kubernetes v1.0 版本,代理完全在 userspace。在 Kubernetes v1.1 版本,新增了 iptables 代理,但并不是默认的运行模式。从 Kubernetes v1.2 起,默认就是 iptables 代理。在 Kubernetes v1.8.0-beta.0 中,添加了 ipvs 代理.
更改为ipvs模式
每个节点操作
apt update -y
apt install ipvsadm ipset -y
2
cat <<EOF | tee /etc/modules-load.d/ipvs.conf
ip_vs
ip_vs_rr
ip_vs_wrr
ip_vs_sh
nf_conntrack
EOF

# 立即加载
modprobe ip_vs
modprobe ip_vs_rr
modprobe ip_vs_wrr
modprobe ip_vs_sh
modprobe nf_conntrack
2
3
4
5
6
7
8
9
10
11
12
13
14
15
master 上执行
kubectl edit configmap kube-proxy -n kube-system
mode: "ipvs"

kubectl delete pod -n kube-system -l k8s-app=kube-proxy
kubectl get pods -n kube-system -l k8s-app=kube-proxy
2
3
4
5
service类型
- ClusterIP:默认类型,自动分配一个仅 Cluster 内部可以访问的虚拟 IP,创建 Service 时不指定类型时的默认值,只能在 Kubernetes 集群内部访问。
- NodePort:在 ClusterIP 基础上为 Service 在每台机器上绑定一个端口,这样就可以通过 NodeIP:NodePort 来访问该服务,在每个节点上开放一个静态端口(30000-32767)
- LoadBalancer:在 NodePort 的基础上,借助 cloud provider 创建一个外部负载均衡器,并将请求转发到 NodeIP:NodePort
- ExternalName:把集群外部的服务引入到集群内部来,在集群内部直接使用。没有任何类型代理被创建,这只有 kubernetes 1.7 或更高版本的 kube-dns 才支持,通过 DNS CNAME 记录
# ClusterIP
apiVersion: apps/v1
kind: Deployment
metadata:
 name: myapp-clusterip-deploy
 namespace: default
spec:
 replicas: 3
 selector:
   matchLabels:
     app: myapp
     release: stabel
     svc: clusterip
 template:
   metadata:
     labels:
       app: myapp
       release: stabel
       env: test
       svc: clusterip
   spec:
     containers:
     - name: myapp-container
       image: wangyanglinux/myapp:v1.0
       imagePullPolicy: IfNotPresent
       ports:
       - name: http
         containerPort: 80
       readinessProbe:
         httpGet:
           port: 80
           path: /index1.html
         initialDelaySeconds: 1
         periodSeconds: 3
2
3
4
5
6
7
8
9
10
11
12
13
14
15
16
17
18
19
20
21
22
23
24
25
26
27
28
29
30
31
32
33
apiVersion: v1
kind: Service
metadata:
  name: myapp-clusterip
  namespace: default
spec:
  type: ClusterIP
  selector:
    app: myapp
    release: stabel
    svc: clusterip
  ports:
    - name: http
      port: 80
      targetPort: 80
2
3
4
5
6
7
8
9
10
11
12
13
14
15
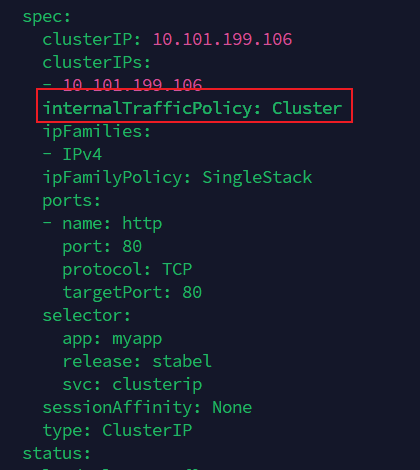
Cluster(默认)
流量会在 整个集群的所有 Pod 之间做负载均衡。
无论访问 Service 的 Pod 在哪个节点,流量都有可能被转发到任意一个符合 selector 的 Pod。
Local
流量只会转发到 和客户端在同一节点上的 Pod。
如果本节点没有对应的 Pod,那么请求会失败(没有 Endpoints)。
持久化链接
sessionAffinity: Clientip
root@node01:~/k8s/6# kubectl explain svc.spec.sessionAffinityConfig.clientIP
KIND:       Service
VERSION:    v1

FIELD: clientIP <ClientIPConfig>


DESCRIPTION:
    clientIP contains the configurations of Client IP based session affinity.
    ClientIPConfig represents the configurations of Client IP based session
    affinity.

FIELDS:
  timeoutSeconds        <integer>
    timeoutSeconds specifies the seconds of ClientIP type session sticky time.
    The value must be >0 && <=86400(for 1 day) if ServiceAffinity == "ClientIP".
    Default value is 10800(for 3 hours).
2
3
4
5
6
7
8
9
10
11
12
13
14
15
16
17
# NodePort
apiVersion: apps/v1
kind: Deployment
metadata:
 name: myapp-nodeport-deploy
 namespace: default
spec:
 replicas: 3
 selector:
   matchLabels:
     app: myapp
     release: stabel
     svc: nodeport
 template:
   metadata:
     labels:
       app: myapp
       release: stabel
       env: test
       svc: nodeport
   spec:
     containers:
     - name: myapp-container
       image: wangyanglinux/myapp:v1.0
       imagePullPolicy: IfNotPresent
       ports:
       - name: http
         containerPort: 80
2
3
4
5
6
7
8
9
10
11
12
13
14
15
16
17
18
19
20
21
22
23
24
25
26
27
apiVersion: v1
kind: Service
metadata:
 name: myapp-nodeport
 namespace: default
spec:
 type: NodePort
 selector:
   app: myapp
   release: stabel
   svc: nodeport
 ports:
 - name: http
   port: 80
   targetPort: 80
   nodePort: 30010
2
3
4
5
6
7
8
9
10
11
12
13
14
15
16
默认有负载均衡,可以通过任意一个node的真实IP:Port去访问,即使node上没有对应的pod运行
externalTrafficPolicy: Cluster #控制负载均衡
如果改为Local,则只能由对应运行的node去访问,并且只能访问其运行的pod
externalTrafficPolicy: Local
# LoadBalancer
apiVersion: v1
kind: Service
metadata:
    annotations:
        service.beta.kubernetes.io/alibaba-cloud-loadbalancer-id: ${YOUR_LB_ID}
        service.beta.kubernetes.io/alicloud-loadbalancer-force-override-listeners: 'true'
    labels:
        app: nginx
    name: my-nginx-svc
    namespace: default
spec:
    ports:
    - port: 80
      protocol: TCP
      targetPort: 80
    selector:
        app: nginx
    type: LoadBalancer
2
3
4
5
6
7
8
9
10
11
12
13
14
15
16
17
18
# ExternalName
kind: Service
apiVersion: v1
metadata:
    name: my-service-1
    namespace: default
spec:
    type: ExternalName
    externalName: www.baidu.com
2
3
4
5
6
7
8
# 在 Pod 内部访问
ping svcName.namespaceName.svc.cluster.local.
# 返回百度的IP
2
3

# Endpoints
自动关联体系:配置selector
手动关联体系:无配置selector
apiVersion: v1
kind: Service
metadata:
 name: nginx-noselectt
spec:
 ports:
   - protocol: TCP
     port: 6666
     targetPort: 80
---
apiVersion: v1
kind: Endpoints
metadata:
 name: nginx-noselectt
subsets:
 - addresses:
     - ip: 192.168.66.12
   ports:
     - port: 80
2
3
4
5
6
7
8
9
10
11
12
13
14
15
16
17
18
19
docker run -itd -p 80:80 --net host wangyanglinux/myapp:v1
如果 Endpoint 需要跟踪多个 ip (多个 pod 或者容器或者应用),可以使用
  ' - ip: 172.17.0.2
     - ip: 172.17.0.3
     - ip: 172.17.0.4'
     ... ...
2
3
4
# publishNotReadyAddresses
在默认情况下,Kubernetes Service 只会将处于 Ready 状态的 Pod 的 IP 地址加入到其 Endpoints 列表(或现代 EndpointSlice 列表)中。客户端的请求只会被负载均衡到这些就绪的 Pod 上。
当设置了 publishNotReadyAddresses: true 后,Service 的行为会发生改变:允许 Kubernetes Service 将未就绪的 Pod 的 IP 地址发布到 Endpoints 中
创建pod
apiVersion: v1
kind: Pod
metadata:
 name: readiness-httpget-pod
 namespace: default
 labels:
   app: myapp
   env: test
spec:
 containers:
 - name: readiness-httpget-container
   image: wangyanglinux/myapp:v1.0
   imagePullPolicy: IfNotPresent
   readinessProbe:
     httpGet:
       port: 80
       path: /index1.html
     initialDelaySeconds: 1
     periodSeconds: 3
2
3
4
5
6
7
8
9
10
11
12
13
14
15
16
17
18
19
创建service
apiVersion: v1
kind: Service
metadata:
 labels:
   app: myapp
 name: myapp
spec:
 ports:
 - name: 80-80
   port: 80
   protocol: TCP
   targetPort: 80
 selector:
   app: myapp
 type: ClusterIP
2
3
4
5
6
7
8
9
10
11
12
13
14
15
添加 publishNotReadyAddresses: true
kubectl patch service myapp -p '{"spec":{"publishNotReadyAddresses": true}}'
# 存储
元数据
configMap:用于保存配置数据(明文)
Secret:用于保存敏感性数据(编码)
Downward API:容器在运行时从 Kubernetes API 服务器获取有关它们自身的信息
真实数据
Volume:用于存储临时或者持久性数据
PersistentVolume:申请制的持久化存储
# configMap
ConfigMap 功能在 Kubernetes1.2 版本中引入,许多应用程序会从配置文件、命令行参数或环境变量中读取配置信息。ConfigMap API 给我们提供了向容器中注入配置信息的机制,ConfigMap 可以被用来保存单个属性,也可以用来保存整个配置文件或者 JSON 二进制等对象
创建
# 从文件创建 ConfigMap
kubectl create configmap game-config --from-file=test.file
# 从字面值创建 ConfigMap
kubectl create configmap literal-config --from-literal=name=dave --from-literal=password=pass
2
3
4
# 环境变量
apiVersion: v1
kind: ConfigMap
metadata:
 name: literal-config
 namespace: default
data:
 name: dave
 password: pass
---
apiVersion: v1
kind: ConfigMap
metadata:
 name: env-config
 namespace: default
data:
 log_level: INFO
---
apiVersion: v1
kind: Pod
metadata:
 name: cm-env-pod
spec:
 containers:
   - name: myapp-container
     image: wangyanglinux/myapp:v1.0
     command: [ "/bin/sh", "-c", "env" ]
     env:
       - name: USERNAME
         valueFrom:
           configMapKeyRef:
             name: literal-config
             key: name
       - name: PASSWORD
         valueFrom:
           configMapKeyRef:
             name: literal-config
             key: password
     envFrom:
       - configMapRef:
           name: env-config
 restartPolicy: Never
2
3
4
5
6
7
8
9
10
11
12
13
14
15
16
17
18
19
20
21
22
23
24
25
26
27
28
29
30
31
32
33
34
35
36
37
38
39
40
41
# 启动命令
apiVersion: v1
kind: Pod
metadata:
 name: cm-command-pod
spec:
 containers:
   - name: myapp-container
     image: wangyanglinux/myapp:v1.0
     command: [ "/bin/sh", "-c", "echo $(USERNAME) $(PASSWORD)" ]
     env:
       - name: USERNAME
         valueFrom:
           configMapKeyRef:
             name: literal-config
             key: name
       - name: PASSWORD
         valueFrom:
           configMapKeyRef:
             name: literal-config
             key: password
 restartPolicy: Never
2
3
4
5
6
7
8
9
10
11
12
13
14
15
16
17
18
19
20
21
# 文件
apiVersion: v1
kind: Pod
metadata:
 name: cm-volume-pod
spec:
 containers:
   - name: myapp-container
     image: wangyanglinux/myapp:v1.0
     volumeMounts:
     - name: config-volume
       mountPath: /etc/config
 volumes:
   - name: config-volume
     configMap:
       name: literal-config
 restartPolicy: Never
2
3
4
5
6
7
8
9
10
11
12
13
14
15
16
# 热更新
vim default.conf
server {
   listen 80 default_server;
   server_name example.com www.example.com;
   location / {
       root   /usr/share/nginx/html;
       index index.html index.htm;
    }
}
2
3
4
5
6
7
8
kubectl create cm default-nginx --from-file=default.conf
apiVersion: apps/v1
kind: Deployment
metadata:
 labels:
   app: hotupdate-deploy
 name: hotupdate-deploy
spec:
 replicas: 5
 selector:
   matchLabels:
     app: hotupdate-deploy
 template:
   metadata:
     labels:
       app: hotupdate-deploy
   spec:
     containers:
     - image: nginx
       name: nginx
       volumeMounts:
       - name: config-volume
         mountPath: /etc/nginx/conf.d/
     volumes:
       - name: config-volume
         configMap:
           name: default-nginx
2
3
4
5
6
7
8
9
10
11
12
13
14
15
16
17
18
19
20
21
22
23
24
25
26
触发热更新
更新 ConfigMap 目前并不会触发相关 Pod 的滚动更新,可以通过修改 pod annotations 的方式强制触发滚动更新
kubectl patch deployment hotupdate-deploy --patch '{"spec": {"template": {"metadata": {"annotations": {"version/config":"66666666"}}}}}'
更新 ConfigMap 后:
使用该 ConfigMap 挂载的 Env 不会同步更新 使用该 ConfigMap 挂载的 Volume 中的数据需要一段时间(实测大概10秒)才能同步更新
Kubernetes 给不可变的 ConfigMap 和 Secret 提供了一种可选配置,可以设置各个 Secret 和 ConfigMap 为不可变的。对于大量使用 configmap 的集群(至少有成千上万各不相同的 configmap 供 Pod 挂载),禁止变更它们的数据有下列好处:
主要优势: 防止意外(或非预期的)更新导致应用程序中断 通过将 configmap 标记为不可变来关闭 kube-apiserver 对其的监视,从而显著降低 kube-apiserver 的负载,提升集群性能。
KIND: ConfigMap
VERSION: v1

FIELD: immutable <boolean>

DESCRIPTION:
Immutable, if set to true, ensures that data stored in the ConfigMap cannot be updated (only object metadata can be modified). If not set to true, the field can be modified at any time. Defaulted to nil.
2
3
4
5
6
7
# Secret
Secret 对象类型用来保存敏感信息,例如密码、OAuth 令牌和 SSH 密钥。将这些信息放在 secret 中比放在 Pod 的定义或者容器镜像中来说更加安全和灵活。
Kubernetes 通过仅仅将 Secret 分发到需要访问 Secret 的 Pod 所在的机器节点来保障其安全性
Secret 只会存储在节点的内存中,永不写入物理存储,这样从节点删除 Secret 时就不需要擦除磁盘数据
从 Kubernetes 1.7 版本开始,etcd 会以加密形式存储 Secret,一定程度的保证了 Secret 安全性
类型
- Opaque → 用户定义的任意数据
- kubernetes.io/service-account-token → 服务账号令牌
- kubernetes.io/dockercfg → ~/.dockercfg 文件的序列化形式
- kubernetes.io/dockerconfigjson → ~/.docker/config.json 文件的序列化形式
- kubernetes.io/basic-auth → 用于基本身份认证的凭据
- kubernetes.io/ssh-auth → 用于SSH身份认证的凭据
- kubernetes.io/tls → 用于TLS客户端或者服务器端的数据
- bootstrap.kubernetes.io/token → 启动引导令牌数据
# Opaque
apiVersion: v1
kind: Secret
metadata:
 name: mysecret
type: Opaque
data:
 password: MWYyZDFlMmU2N2Rm
 username: YWRtaW4=
2
3
4
5
6
7
8
Opaque Secret env
apiVersion: apps/v1
kind: Deployment
metadata:
 labels:
   app: opaque-secret-env
 name: opaque-secret-env-deploy
spec:
 replicas: 5
 selector:
   matchLabels:
     app: op-se-env-pod
 template:
   metadata:
     labels:
       app: op-se-env-pod
   spec:
     containers:
     - image: wangyanglinux/myapp:v1.0
       name: myapp-continaer
       ports:
       - containerPort: 80
       env:
       - name: TEST_USER
         valueFrom:
           secretKeyRef:
             name: mysecret
             key: username
       - name: TEST_PASSWORD
         valueFrom:
           secretKeyRef:
             name: mysecret
             key: password
2
3
4
5
6
7
8
9
10
11
12
13
14
15
16
17
18
19
20
21
22
23
24
25
26
27
28
29
30
31
32
Opaque Secret Volume
apiVersion: v1
kind: Pod
metadata:
 labels:
   name: secret-volume
 name: secret-volume-pod
spec:
 volumes:
 - name: volumes12
   secret:
     secretName: mysecret
 containers:
 - image: wangyanglinux/myapp:v1.0
   name: myapp-container
   volumeMounts:
   - name: volumes12
     mountPath: "/data"
2
3
4
5
6
7
8
9
10
11
12
13
14
15
16
17
# 设置保存文件的权限
 volumes:
 - name: volumes12
   secret:
     secretName: mysecret
     defaultMode: 256
# 设置要保存挂载的选项,这里只保存username
 volumes:
 - name: volumes12
   secret:
     secretName: mysecret
     items:
     - key: username
       path: my-group/my-username
2
3
4
5
6
7
8
9
10
11
12
13
14
# downward-api
Downward API 是 Kubernetes 中的一个功能,它允许容器在运行时从 Kubernetes API 服务器获取有关它们自身的信息。这些信息可以作为容器内部的环境变量或文件注入到容器中,以便容器可以获取有关其运行环境的各种信息,如 Pod 名称、命名空间、标签等
提供容器元数据
动态配置
与 Kubernetes 环境集成
env
apiVersion: v1
kind: Pod
metadata:
 name: downward-api-env-example
spec:
 containers:
 - name: my-container
   image: wangyanglinux/myapp:v1.0
   env:
   - name: POD_NAME
     valueFrom:
       fieldRef:
         fieldPath: metadata.name
   - name: POD_NAMESPACE
     valueFrom:
       fieldRef:
         fieldPath: metadata.namespace
   - name: POD_IP
     valueFrom:
       fieldRef:
         fieldPath: status.podIP
   - name: CPU_REQUEST
     valueFrom:
       resourceFieldRef:
         resource: requests.cpu
   - name: CPU_LIMIT
     valueFrom:
       resourceFieldRef:
         resource: limits.cpu
   - name: MEMORY_REQUEST
     valueFrom:
       resourceFieldRef:
         resource: requests.memory
   - name: MEMORY_LIMIT
     valueFrom:
       resourceFieldRef:
         resource: limits.memory
 restartPolicy: Never
2
3
4
5
6
7
8
9
10
11
12
13
14
15
16
17
18
19
20
21
22
23
24
25
26
27
28
29
30
31
32
33
34
35
36
37
38
volume
apiVersion: v1
kind: Pod
metadata:
 name: downward-api-volume-example
spec:
 containers:
 - name: my-container
   image: wangyanglinux/myapp:v1.0
   resources:
     limits:
       cpu: "1"
       memory: "512Mi"
     requests:
       cpu: "0.5"
       memory: "256Mi"
   volumeMounts:
   - name: downward-api-volume
     mountPath: /etc/podinfo
 volumes:
 - name: downward-api-volume
   downwardAPI:
     items:
     - path: "annotations"
       fieldRef:
         fieldPath: metadata.annotations
     - path: "labels"
       fieldRef:
         fieldPath: metadata.labels
     - path: "name"
       fieldRef:
         fieldPath: metadata.name
     - path: "namespace"
       fieldRef:
         fieldPath: metadata.namespace
     - path: "uid"
       fieldRef:
         fieldPath: metadata.uid
     - path: "cpuRequest"
       resourceFieldRef:
         containerName: my-container
         resource: requests.cpu
     - path: "memoryRequest"
       resourceFieldRef:
         containerName: my-container
         resource: requests.memory
     - path: "cpuLimit"
       resourceFieldRef:
         containerName: my-container
         resource: limits.cpu
     - path: "memoryLimit"
       resourceFieldRef:
         containerName: my-container
         resource: limits.memory
 restartPolicy: Never
2
3
4
5
6
7
8
9
10
11
12
13
14
15
16
17
18
19
20
21
22
23
24
25
26
27
28
29
30
31
32
33
34
35
36
37
38
39
40
41
42
43
44
45
46
47
48
49
50
51
52
53
54
基于 apiServer 访问集群
Downward API 提供了一种简单的方式,将 pod 和容器的元数据传递给在它们内部运行的进程。但这种方式其实仅仅可以暴露一个 pod 自身的元数据,而且只可以暴露部分元数据。
apiVersion: rbac.authorization.k8s.io/v1
kind: ClusterRoleBinding
metadata:
 name: test-api-cluster-admin-binding
subjects:
- kind: ServiceAccount
  name: test-api
  namespace: default
roleRef:
 kind: ClusterRole
 name: cluster-admin
 apiGroup: rbac.authorization.k8s.io
2
3
4
5
6
7
8
9
10
11
12
kubectl create sa test-api
apiVersion: v1
kind: Pod
metadata:
 name: curl
spec:
 serviceAccountName: test-api
 containers:
 - name: main
   image: curlimages/curl:latest
   command: ["sleep", "9999"]
2
3
4
5
6
7
8
9
10
kubectl exec -it curl -- /bin/bash
root@curl:/# TOKEN=$( cat /var/run/secrets/kubernetes.io/serviceaccount/token )
root@curl:/# CAPATH="/var/run/secrets/kubernetes.io/serviceaccount/ca.crt"
root@curl:/# NS=$( cat /var/run/secrets/kubernetes.io/serviceaccount/namespace )
root@curl:/# curl -H "Authorization: Bearer $TOKEN" --cacert $CAPATH https://kubernetes/api/v1/namespaces/$NS/pods
2
3
4
5
kubectl proxy —port=8080
curl localhost:8080/openapi/v2 > k8s-swagger.json
docker run --rm -d -p 80:8080 -e SWAGGER_JSON=/k8s-swagger.json -v $(pwd)/k8s-swagger.json:/k8s-swagger.json swaggerapi/swagger-ui
2
3
# Volume
容器磁盘上的文件的生命周期是短暂的,这就使得在容器中运行重要应用时会出现一些问题。首先,当容器崩溃时,kubelet 会重启它,但是容器中的文件将丢失——容器以干净的状态(镜像最初的状态)重新启动。其次,在 Pod中同时运行多个容器时,这些容器之间通常需要共享文件。Kubernetes 中的 Volume抽象就很好的解决了这些问题
类型:
awsElasticBlockStore 、azureDisk、azureFile、cephfs、 csidownwardAPI、 emptyDir、fc
flocker、gcePersistentDisk、gitRepo、glusterfs、hostPath、iscsi
local、nfs、persistentVolumeClaim、projected、portworxVolume
quobyte、rbd、scaleIO、secret、storageos、vsphereVolume
# emptydir-disk
当Pod被分配给节点时,首先创建emptyDir卷,并且只要该Pod在该节点上运行,该卷就会存在。正如卷的名字所述,它最初是空的。Pod中的容器可以读取和写入emptyDir卷中的相同文件,尽管该卷可以挂载到每个容器中的相同或不同路径上。当出于任何原因从节点中删除Pod时,emptyDir中的数据将被永久删除。
容器崩溃不会从节点中移除pod,因此emptyDir卷中的数据在容器崩溃时是安全的。
emptyDir的用法有:
- 暂存空间,例如用于基于磁盘的合并排序、用作长时间计算崩溃恢复时的检查点
- Web服务器容器提供数据时,保存内容管理器容器提取的文件
在kubelet的工作目录(root-dir参数控制),默认为/var/lib/kubelet,会为每个使用了emptyDir:{}的pod创建一个目录,格式如**/var/lib/kubelet/pods/{poduid}/volumes/kubernetes.io~empty-dir/,所有放在emptyDir中数据,最终都是落在了node的上述路径中。(在运行pod的node上)**
apiVersion: v1
kind: Pod
metadata:
 name: volume-emptydir-disk-pod
 namespace: default
spec:
 containers:
 - name: myapp
   image: wangyanglinux/myapp:v1.0
   ports:
   - containerPort: 80
   volumeMounts:
   - name: logs-volume
     mountPath: /usr/local/nginx/logs
 - name: busybox
   image: wangyanglinux/tools:busybox
   command: ["/bin/sh","-c","touch /logs/access.log && tail -f /logs/access.log"]
   volumeMounts:
   - name: logs-volume
     mountPath: /logs
 volumes:
 - name: logs-volume
   emptyDir: {}
2
3
4
5
6
7
8
9
10
11
12
13
14
15
16
17
18
19
20
21
22
23
kubectl get pod volume-emptydir-disk-pod -o yaml | grep uid

# emptydir-mem
apiVersion: v1
kind: Pod
metadata:
 name: volume-emptydir-mem
 namespace: default
spec:
 containers:
 - name: myapp
   image: wangyanglinux/myapp:v1.0
   ports:
   - containerPort: 80
   resources:
     limits:
       cpu: "1"
       memory: 1024Mi
     requests:
       cpu: "1"
       memory: 1024Mi
   volumeMounts:
   - name: mem-volume
     mountPath: /data
 volumes:
 - name: mem-volume
   emptyDir:
     medium: Memory
     sizeLimit: 500Mi
2
3
4
5
6
7
8
9
10
11
12
13
14
15
16
17
18
19
20
21
22
23
24
25
26
# hostPath
hostPath 卷将主机节点的文件系统中的文件或目录挂载到集群中
hostPath 用途如下
运行需要访问 Docker 内部的容器;使用 /var/lib/docker 的 hostPath
在容器中运行 cAdvisor;使用 /dev/cgroups 的 hostPath
允许 pod 指定给定的 hostPath 是否应该在 pod 运行之前存在,是否应该创建,以及它应该以什么形式存在
除了所需的 path 属性之外,用户还可以为 hostPath 卷指定 type
注意:
- 由于每个节点上的文件都不同,具有相同配置(例如从 podTemplate 创建的)的 pod 在不同节点上的行为可能会有所不同
- 当 Kubernetes 按照计划添加资源感知调度时,将无法考虑
hostPath使用的资源 - 在底层主机上创建的文件或目录只能由 root 写入。您需要在特权容器中以 root 身份运行进程,或修改主机上的文件权限以便写入
hostPath卷
参数
- 空:(默认) 空字符串(默认)用于向后兼容,这意味着在挂载 hostPath 卷之前不会执行任何检查。
- DirectoryOrCreate: 如果在给定的路径上没有任何东西存在,那么将根据需要在那里创建一个空目录,权限设置为 0755,与 Kubelet 具有相同的组和所有权。
- Directory: 给定的路径下必须存在目录
- FileOrCreate: 如果在给定的路径上没有任何东西存在,那么会根据需要创建一个空文件,权限设置为 0644,与 Kubelet 具有相同的组和所有权。
- File: 给定的路径下必须存在文件
- Socket: 给定的路径下必须存在 UNIX 套接字
- CharDevice: 给定的路径下必须存在字符设备
- BlockDevice: 给定的路径下必须存在块设备
apiVersion: v1
kind: Pod
metadata:
 name: hostpath-pod
spec:
 containers:
 - image: wangyanglinux/myapp:v1.0
   name: myapp
   volumeMounts:
   - mountPath: /test-pd
     name: test-volume
 volumes:
 - name: test-volume
   hostPath:
      # directory location on host
     path: /data
      # this field is optional
     type: Directory
2
3
4
5
6
7
8
9
10
11
12
13
14
15
16
17
18
# PV/PVC
pv/pvc关联方式
容量:PV的值不小于PVC要求,可以大于最好一致
读写策略:完全匹配
单节点读写-ReadWriteOnce-RWO
多节点只读-ReadOnlyMany-ROX
多节点读写-ReadWriteMany-RWX
存储类:PV的类与PVC的类必须一致,不存在包容降级关系
pv/pvc回收策略
- Retain(保留):手动回收
- Recycle(回收):基本擦除(rm -rf /thevolume/*)
- Delete(删除):关联的存储资产(例如AWS EBS、GCE PD、Azure Disk 和OpenStack Cinder 卷)将被删除
- 当前,只有NFS和HostPath支持回收策略。AWS EBS、GCE PD、Azure Disk和Cinder卷支持删除策略
pv/pvc状态
Available(可用)- 一块空闲资源还没有被任何声明所绑定
Bound(已绑定)- 卷已经被声明绑定
Released(已释放)- 声明被删除,但是资源还未被集群重新声明
Failed(失败)- 该卷的自动回收失败
命令行会显示绑定到PV的PVC的名称
pv/pvc-pvc保护
PVC 保护的目的是确保由 pod 正在使用的 PVC 不会从系统中移除,因为如果被移除的话可能会导致数据丢失。 注意:当 pod 状态为 Pending并且 pod 已经分配给节点或 pod 为 Running状态时,PVC 处于活动状态 当启用 PVC 保护功能时,如果用户删除了一个 pod 正在使用的 PVC,则该 PVC 不会被立即删除。PVC 的删除将被推迟,直到 PVC 不再被任何 pod 使用。
# StatefulSet部署
特性
- 稳定的网络访问模式
- 稳定的存储卷
- 有序创建,有序删除
# 安装nfs
客户端
apt update
apt install nfs-common -y
2
服务端
apt update
apt install nfs-kernel-server -y
2
服务端执行
mkdir /nfsdata
chmod 666 /nfsdata
chown nobody /nfsdata
cat /etc/exports
 /nfsdata/1 *(rw,no_root_squash,no_all_squash,sync)
 /nfsdata/2 *(rw,no_root_squash,no_all_squash,sync)
 /nfsdata/3 *(rw,no_root_squash,no_all_squash,sync)
 /nfsdata/4 *(rw,no_root_squash,no_all_squash,sync)
 /nfsdata/5 *(rw,no_root_squash,no_all_squash,sync)
 /nfsdata/6 *(rw,no_root_squash,no_all_squash,sync)
 /nfsdata/7 *(rw,no_root_squash,no_all_squash,sync)
 /nfsdata/8 *(rw,no_root_squash,no_all_squash,sync)
 /nfsdata/9 *(rw,no_root_squash,no_all_squash,sync)
 /nfsdata/10 *(rw,no_root_squash,no_all_squash,sync)
cd /nfsdata
mkdir {1..10}
echo 1 >> 1/index.html
echo 2 >> 2/index.html
echo 3 >> 3/index.html
echo 4 >> 4/index.html
echo 5 >> 5/index.html
echo 6 >> 6/index.html
echo 7 >> 7/index.html
echo 8 >> 8/index.html
echo 9 >> 9/index.html
echo 10 >> 10/index.html
systemctl restart nfs-server
# 查看共享结果
showmount -e ServerIP
2
3
4
5
6
7
8
9
10
11
12
13
14
15
16
17
18
19
20
21
22
23
24
25
26
27
28
29
客户端
mkdir /nfstest
mount -t nfs ServerIP:/nfsdata/1 /nfstest/
# 解除挂载
umount /nfstest/
2
3
4
部署 PV
apiVersion: v1
kind: PersistentVolume
metadata:
 name: nfspv1
spec:
 capacity:
   storage: 1Gi
 accessModes:
   - ReadWriteOnce
 persistentVolumeReclaimPolicy: Recycle
 storageClassName: nfs
 nfs:
   path: /nfsdata/1
   server: 66.235.170.12
---
apiVersion: v1
kind: PersistentVolume
metadata:
 name: nfspv2
spec:
 capacity:
   storage: 0.9Gi
 accessModes:
   - ReadWriteOnce
 persistentVolumeReclaimPolicy: Recycle
 storageClassName: nfs
 nfs:
   path: /nfsdata/2
   server: 66.235.170.12
---
apiVersion: v1
kind: PersistentVolume
metadata:
 name: nfspv3
spec:
 capacity:
   storage: 1.2Gi
 accessModes:
   - ReadWriteOnce
 persistentVolumeReclaimPolicy: Recycle
 storageClassName: nfs
 nfs:
   path: /nfsdata/3
   server: 66.235.170.12
---
apiVersion: v1
kind: PersistentVolume
metadata:
 name: nfspv4
spec:
 capacity:
   storage: 1Gi
 accessModes:
   - ReadWriteOnce
 persistentVolumeReclaimPolicy: Recycle
 storageClassName: nfs
 nfs:
   path: /nfsdata/4
   server: 66.235.170.12
---
apiVersion: v1
kind: PersistentVolume
metadata:
 name: nfspv5
spec:
 capacity:
   storage: 1Gi
 accessModes:
   - ReadWriteMany
 persistentVolumeReclaimPolicy: Recycle
 storageClassName: nfs
 nfs:
   path: /nfsdata/5
   server: 66.235.170.12
---
apiVersion: v1
kind: PersistentVolume
metadata:
 name: nfspv6
spec:
 capacity:
   storage: 1Gi
 accessModes:
   - ReadWriteOnce
 persistentVolumeReclaimPolicy: Recycle
 storageClassName: nfs1
 nfs:
   path: /nfsdata/6
   server: 66.235.170.12
---
apiVersion: v1
kind: PersistentVolume
metadata:
 name: nfspv7
spec:
 capacity:
   storage: 1Gi
 accessModes:
   - ReadWriteOnce
 persistentVolumeReclaimPolicy: Retain
 storageClassName: nfs
 nfs:
   path: /nfsdata/7
   server: 66.235.170.12
2
3
4
5
6
7
8
9
10
11
12
13
14
15
16
17
18
19
20
21
22
23
24
25
26
27
28
29
30
31
32
33
34
35
36
37
38
39
40
41
42
43
44
45
46
47
48
49
50
51
52
53
54
55
56
57
58
59
60
61
62
63
64
65
66
67
68
69
70
71
72
73
74
75
76
77
78
79
80
81
82
83
84
85
86
87
88
89
90
91
92
93
94
95
96
97
98
99
100
101
102
103
104
创建服务并使用 PVC
apiVersion: v1
kind: Service
metadata:
 name: nginx
 labels:
   app: nginx
spec:
 ports:
 - port: 80
   name: web
 clusterIP: None
 selector:
   app: nginx
---
apiVersion: apps/v1
kind: StatefulSet
metadata:
 name: web
spec:
 selector:
   matchLabels:
     app: nginx
 serviceName: "nginx"
 replicas: 3
 template:
   metadata:
     labels:
       app: nginx
   spec:
     containers:
     - name: nginx
       image: wangyanglinux/myapp:v1.0
       ports:
       - containerPort: 80
         name: web
       volumeMounts:
       - name: www
         mountPath: /usr/local/nginx/html
 volumeClaimTemplates:
 - metadata:
     name: www
   spec:
     accessModes: [ "ReadWriteOnce" ]
     storageClassName: "nfs"
     resources:
       requests:
         storage: 1Gi
2
3
4
5
6
7
8
9
10
11
12
13
14
15
16
17
18
19
20
21
22
23
24
25
26
27
28
29
30
31
32
33
34
35
36
37
38
39
40
41
42
43
44
45
46
47
# storageclass
StorageClass 是一种资源对象,用于定义持久卷(Persistent Volumes)的动态供给(Dynamic Provisioning)策略。StorageClass 允许管理员定义不同类型的存储,并指定如何动态创建持久卷以供应用程序使用。这使得 Kubernetes 集群中的存储管理更加灵活和自动化。
vim /etc/exports
# 新增
/nfsdata/share *(rw,no_root_squash,no_all_squash,sync)
mkdir /nfsdata/share
chown -R nobody /nfsdata/share/
systemctl restart nfs-server
2
3
4
5
6
部署 nfs-client-provisioner
nfs-client-provisioner 是一个 Kubernetes 供应商,用于动态提供由 NFS (Network File System) 共享支持的持久卷。在 Kubernetes 中,持久卷是独立于 pod 存在的存储资源,可以在 pod 重新启动或重新调度时持久地存储数据。 nfs-client-provisioner 自动化了根据需要创建持久卷的过程,通过与 NFS 服务器交互。在需要在 Kubernetes 集群中为应用程序动态分配存储而无需手动管理 NFS 共享和持久卷创建的情况下,这尤其有用。
kind: Deployment
apiVersion: apps/v1
metadata:
 name: nfs-client-provisioner
 namespace: nfs-storageclass
spec:
 replicas: 1
 selector:
   matchLabels:
     app: nfs-client-provisioner
 strategy:
   type: Recreate
 template:
   metadata:
     labels:
       app: nfs-client-provisioner
   spec:
     serviceAccountName: nfs-client-provisioner
     containers:
       - name: nfs-client-provisioner
          # image: registry.k8s.io/sig-storage/nfs-subdir-external-provisioner:v4.0.2
         image: registry.k8s.io/sig-storage/nfs-subdir-external-provisioner:v4.0.2
         volumeMounts:
           - name: nfs-client-root
             mountPath: /persistentvolumes
         env:
           - name: PROVISIONER_NAME
             value: k8s-sigs.io/nfs-subdir-external-provisioner
           - name: NFS_SERVER
              # value: <YOUR NFS SERVER HOSTNAME>
             value: 66.235.170.12
           - name: NFS_PATH
              # value: /var/nfs
             value: /nfsdata/share
     volumes:
       - name: nfs-client-root
         nfs:
            # server: <YOUR NFS SERVER HOSTNAME>
           server: 66.235.170.12
            # share nfs path
           path: /nfsdata/share
2
3
4
5
6
7
8
9
10
11
12
13
14
15
16
17
18
19
20
21
22
23
24
25
26
27
28
29
30
31
32
33
34
35
36
37
38
39
40
41
apiVersion: v1
kind: ServiceAccount
metadata:
 name: nfs-client-provisioner
  # replace with namespace where provisioner is deployed
 namespace: nfs-storageclass
---
kind: ClusterRole
apiVersion: rbac.authorization.k8s.io/v1
metadata:
 name: nfs-client-provisioner-runner
rules:
 - apiGroups: [""]
   resources: ["nodes"]
   verbs: ["get", "list", "watch"]
 - apiGroups: [""]
   resources: ["persistentvolumes"]
   verbs: ["get", "list", "watch", "create", "delete"]
 - apiGroups: [""]
   resources: ["persistentvolumeclaims"]
   verbs: ["get", "list", "watch", "update"]
 - apiGroups: ["storage.k8s.io"]
   resources: ["storageclasses"]
   verbs: ["get", "list", "watch"]
 - apiGroups: [""]
   resources: ["events"]
   verbs: ["create", "update", "patch"]
---
kind: ClusterRoleBinding
apiVersion: rbac.authorization.k8s.io/v1
metadata:
 name: run-nfs-client-provisioner
subjects:
 - kind: ServiceAccount
   name: nfs-client-provisioner
    # replace with namespace where provisioner is deployed
   namespace: nfs-storageclass
roleRef:
 kind: ClusterRole
 name: nfs-client-provisioner-runner
 apiGroup: rbac.authorization.k8s.io
---
kind: Role
apiVersion: rbac.authorization.k8s.io/v1
metadata:
 name: leader-locking-nfs-client-provisioner
  # replace with namespace where provisioner is deployed
 namespace: nfs-storageclass
rules:
 - apiGroups: [""]
   resources: ["endpoints"]
   verbs: ["get", "list", "watch", "create", "update", "patch"]
---
kind: RoleBinding
apiVersion: rbac.authorization.k8s.io/v1
metadata:
 name: leader-locking-nfs-client-provisioner
  # replace with namespace where provisioner is deployed
 namespace: nfs-storageclass
subjects:
 - kind: ServiceAccount
   name: nfs-client-provisioner
    # replace with namespace where provisioner is deployed
   namespace: nfs-storageclass
roleRef:
 kind: Role
 name: leader-locking-nfs-client-provisioner
 apiGroup: rbac.authorization.k8s.io
2
3
4
5
6
7
8
9
10
11
12
13
14
15
16
17
18
19
20
21
22
23
24
25
26
27
28
29
30
31
32
33
34
35
36
37
38
39
40
41
42
43
44
45
46
47
48
49
50
51
52
53
54
55
56
57
58
59
60
61
62
63
64
65
66
67
68
apiVersion: storage.k8s.io/v1
kind: StorageClass
metadata:
 name: nfs-client
 namespace: nfs-storageclass
provisioner: k8s-sigs.io/nfs-subdir-external-provisioner
parameters:
 pathPattern: ${.PVC.namespace}/${.PVC.name}
 onDelete: delete
2
3
4
5
6
7
8
9
创建名字空间
kubectl create ns nfs-storageclass
创建测试pod
kind: PersistentVolumeClaim
apiVersion: v1
metadata:
 name: test-claim
 annotations:
spec:
 accessModes:
   - ReadWriteMany
 resources:
   requests:
     storage: 1Mi
 storageClassName: nfs-client
---
kind: Pod
apiVersion: v1
metadata:
 name: test-pod
spec:
 containers:
 - name: test-pod
   image: wangyanglinux/myapp:v1.0
   volumeMounts:
     - name: nfs-pvc
       mountPath: "/usr/local/nginx/html"
 restartPolicy: "Never"
 volumes:
   - name: nfs-pvc
     persistentVolumeClaim:
       claimName: test-claim
2
3
4
5
6
7
8
9
10
11
12
13
14
15
16
17
18
19
20
21
22
23
24
25
26
27
28
29
# 调度器
Scheduler 是 kubernetes 的调度器,主要的任务是把定义的 pod 分配到集群的节点上
Scheduler 是作为单独的程序运行的,启动之后会一直监听 API Server,获取 PodSpec.NodeName 为空的 pod,对每个 pod 都会创建一个 binding,表明该 pod 应该放到哪个节点上。
概念听起来是非常简单的,但有很多要考虑的问题:
◆ 公平:如何保证每个节点都能被分配资源
◆ 资源高效利用:集群所有资源最大化被使用
◆ 效率:调度的性能要好,能够尽快地对大批量的 pod 完成调度工作
◆ 灵活:允许用户根据自己的需求控制调度的逻辑
调度过程
调度分为几个部分:首先是过滤掉不满足条件的节点,这个过程称为预选;然后对通过的节点按照优先级排序,这个是优选;最后从中选择优先级最高的节点。如果中间任何一步骤有错误,就直接返回错误
预选
- PodFitsResources: 节点上剩余的资源是否大于 pod 请求的资源
- PodFitsHost: 如果 pod 指定了 NodeName,检查节点名称是否和 NodeName 匹配
- PodFitsHostPorts: 节点上已经使用的 port 是否和 pod 申请的 port 冲突
- PodSelectorMatches: 过滤掉和 pod 指定的 label 不匹配的节点
- NoDiskConflict: 已经 mount 的 volume 和 pod 指定的 volume 不冲突,除非它们都是只读
优选
如果在预选过程中没有合适的节点,pod 会一直在 pending 状态,不断重试调度,直到有节点满足条件。经过这个步骤,如果有多个节点满足条件,就继续优选过程:按照优先级大小对节点排序。 优先级由一系列键值对组成,键是该优先级项的名称,值是它的权重(该项的重要性)。这些优先级选项包括:
- LeastRequestedPriority:通过计算 CPU 和 Memory 的使用率来决定权重,使用率越低权重越高。换句话说,这个优先级指标倾向于资源使用比例更低的节点。
- BalancedResourceAllocation:节点上 CPU 和 Memory 使用率越接近,权重越高。这个应该和上面的一起使用,不应该单独使用。
- ImageLocalityPriority:倾向于已经有所需镜像的节点,镜像总大小值越大,权重越高。
# 亲和性(Affinity)
node亲和性
preferredDuringSchedulingIgnoredDuringExecution:软亲和
apiVersion: v1
kind: Pod
metadata:
 name: node-affinity-preferred
 labels:
   app: node-affinity-preferred
spec:
 containers:
 - name: node-affinity-preferred-pod
   image: wangyanglinux/myapp:v1.0
 affinity:
   nodeAffinity:
     preferredDuringSchedulingIgnoredDuringExecution:
     - weight: 1
       preference:
         matchExpressions:
         - key: domain
           operator: In
           values:
           - blog
2
3
4
5
6
7
8
9
10
11
12
13
14
15
16
17
18
19
20
requiredDuringSchedulingIgnoredDuringExecution:硬亲和
apiVersion: v1
kind: Pod
metadata:
 name: node-affinity-required
 labels:
   app: node-affinity-required
spec:
 containers:
 - name: node-affinity-required-pod
   image: wangyanglinux/myapp:v1.0
 affinity:
   nodeAffinity:
     requiredDuringSchedulingIgnoredDuringExecution:
       nodeSelectorTerms:
       - matchExpressions:
         - key: kubernetes.io/hostname
           operator: In
           values:
           - node06
2
3
4
5
6
7
8
9
10
11
12
13
14
15
16
17
18
19
pod亲和性
preferredDuringSchedulingIgnoredDuringExecution:软亲和**
apiVersion: v1
kind: Pod
metadata:
 name: pod-aff-prefer
 labels:
   app: pod-aff
spec:
 containers:
 - name: myapp
   image: wangyanglinux/myapp:v1.0
 affinity:
   podAffinity:
     preferredDuringSchedulingIgnoredDuringExecution:
     - weight: 1
       podAffinityTerm:
         labelSelector:
           matchExpressions:
           - key: app
             operator: In
             values:
             - pod-1
         topologyKey: kubernetes.io/hostname
2
3
4
5
6
7
8
9
10
11
12
13
14
15
16
17
18
19
20
21
22
requiredDuringSchedulingIgnoredDuringExecution:硬亲和
apiVersion: v1
kind: Pod
metadata:
 name: pod-aff-req
 labels:
   app: pod-aff-req
spec:
 containers:
 - name: pod-aff-req-c
   image: wangyanglinux/myapp:v1.0
 affinity:
   podAffinity:
     requiredDuringSchedulingIgnoredDuringExecution:
     - labelSelector:
         matchExpressions:
         - key: app
           operator: In
           values:
           - pod-1
       topologyKey: kubernetes.io/hostname
2
3
4
5
6
7
8
9
10
11
12
13
14
15
16
17
18
19
20
# 反亲和性
preferredDuringSchedulingIgnoredDuringExecution:软反亲和**
apiVersion: v1
kind: Pod
metadata:
 name: pod-antiaff-prefer
 labels:
   app: pod-aff
spec:
 containers:
 - name: myapp
   image: wangyanglinux/myapp:v1.0
 affinity:
   podAntiAffinity:
     preferredDuringSchedulingIgnoredDuringExecution:
     - weight: 1
       podAffinityTerm:
         labelSelector:
           matchExpressions:
           - key: app
             operator: In
             values:
             - pod-2
         topologyKey: kubernetes.io/hostname
2
3
4
5
6
7
8
9
10
11
12
13
14
15
16
17
18
19
20
21
22
requiredDuringSchedulingIgnoredDuringExecution:硬反亲和
apiVersion: v1
kind: Pod
metadata:
 name: pod-antiaff-prefer
 labels:
   app: pod-aff
spec:
 containers:
 - name: myapp
   image: wangyanglinux/myapp:v1.0
 affinity:
   podAntiAffinity:
     requiredDuringSchedulingIgnoredDuringExecution:
     - weight: 1
       podAffinityTerm:
         labelSelector:
           matchExpressions:
           - key: app
             operator: In
             values:
             - pod-2
         topologyKey: kubernetes.io/hostname
2
3
4
5
6
7
8
9
10
11
12
13
14
15
16
17
18
19
20
21
22
自定义调度器
除了 kubernetes 自带的调度器,你也可以编写自己的调度器。通过 spec:schedulername参数指定调度器的名字,可以为 pod 选择某个调度器进行调度。比如下面的 pod 选择 my-scheduler进行调度,而不是默认的 default-scheduler:
# 在 kubernetes Master 节点开启 apiServer 的代理
$ kubectl proxy --port=8001
2
基于 shell 编写一个自定义调度器
# vi my-scheduler.sh
#!/bin/bash
SERVER='localhost:8001'
while true;
do
    for PODNAME in $(kubectl --server $SERVER get pods -o json | jq '.items[] |
select(.spec.schedulerName =="my-scheduler") | select(.spec.nodeName == null) |
.metadata.name' | tr -d '"')
    do
        NODES=($(kubectl --server $SERVER get nodes -o json | jq
'.items[].metadata.name' | tr -d '"'))
        NUMNODES=${#NODES[@]}
        CHOSEN=${NODES[$[ $RANDOM % $NUMNODES]]}
        curl --header "Content-Type:application/json" --request POST --data
'{"apiVersion":"v1","kind":"Binding","metadata": {"name":"'$PODNAME'"},"target":
{"apiVersion":"v1","kind": "Node", "name": "'$CHOSEN'"}}'
http://$SERVER/api/v1/namespaces/default/pods/$PODNAME/binding/
        echo "Assigned $PODNAME to $CHOSEN"
    done
    sleep 1
done
2
3
4
5
6
7
8
9
10
11
12
13
14
15
16
17
18
19
20
21
创建一个 deployment 尝试
apiVersion: apps/v1
kind: Deployment
metadata:
 labels:
   app: myapp
 name: myapp
spec:
 replicas: 1
 selector:
   matchLabels:
     app: myapp
 template:
   metadata:
     labels:
       app: myapp
   spec:
     schedulerName: my-scheduler
     containers:
     - image: wangyanglinux/myapp:v1.0
       name: myapp
2
3
4
5
6
7
8
9
10
11
12
13
14
15
16
17
18
19
20
# 污点容忍
Taint 和 toleration 相互配合,可以用来避免 pod 被分配到不合适的节点上。每个节点上都可以应用一个或多个 taint ,这表示对于那些不能容忍这些 taint 的 pod,是不会被该节点接受的。如果将 toleration 应用于 pod 上,则表示这些 pod 可以(但不要求)被调度到具有匹配 taint 的节点上。
污点
key=value:effect 每个污点有一个 key 和 value 作为污点的标签,其中 value 可以为空,effect 描述污点的作用。当前 taint effect 支持如下三个选项: NoSchedule:表示 k8s 将不会将 Pod 调度到具有该污点的 Node 上 PreferNoSchedule:表示 k8s 将尽量避免将 Pod 调度到具有该污点的 Node 上 NoExecute:表示 k8s 将不会将 Pod 调度到具有该污点的 Node 上,同时会将 Node 上已经存在的 Pod 驱逐出去
# 设置污点
kubectl taint nodes node1 key1=value1:NoSchedule

# 节点说明中,查找 Taints 字段
kubectl describe pod pod-name

# 去除污点
kubectl taint nodes node1 key1:NoSchedule-
2
3
4
5
6
7
8
容忍
设置了污点的Node将根据taint的effect:NoSchedule、PreferNoSchedule、NoExecute和Pod之间产生互斥的关系,Pod将在一定程度上不会被调度到Node上。但我们可以在Pod上设置容忍(Toleration),意思是设置了容忍的Pod将可以容忍污点的存在,可以被调度到存在污点的Node上。
设置方式
tolerations:
- key: "key1"
  operator: "Equal"
  value: "value1"
  effect: "NoSchedule"
2
3
4
5
tolerations:
- key: "key1"
  operator: "Equal"
  value: "value1"
  effect: "NoExecute"
  tolerationSeconds: 3600
2
3
4
5
6
特殊类型
当不指定 value时,表示容忍所有的污点 value
tolerations:
- key: "key2"
  operator: "Exists"
  effect: "NoSchedule"
2
3
4
当不指定 key值时,表示容忍所有的污点 key
tolerations:
- operator: "Exists"
2
当不指定 effect 值时,表示容忍所有的污点作用
tolerations:
- key: "key"
  operator: "Exists"
2
3
有多个 Master 存在时,防止资源浪费
kubectl taint nodes Node-Name node-role.kubernetes.io/master=:PreferNoSchedule
# 固定节点调度
指定节点调度(pod.spec.nodeName)
忽略污点设置
apiVersion: apps/v1
kind: Deployment
metadata:
 name: nodename-test
spec:
 replicas: 7
 selector:
   matchLabels:
     app: nodename
 template:
   metadata:
     labels:
       app: nodename
   spec:
     nodeName: k8s-node01
     containers:
     - name: myweb
       image: wangyanglinux/myapp:v1.0
       ports:
       - containerPort: 80
2
3
4
5
6
7
8
9
10
11
12
13
14
15
16
17
18
19
20
指点节点标签调度(pod.spec.nodeSelector)
任然受污点的影响
apiVersion: apps/v1
kind: Deployment
metadata:
 name: nodeselect-test
spec:
 replicas: 2
 selector:
   matchLabels:
     app: nodeselect
 template:
   metadata:
     labels:
       app: nodeselect
   spec:
     nodeSelector:
       type: nodeselect
     containers:
     - name: myweb
       image: wangyanglinux/myapp:v1.0
       ports:
       - containerPort: 80
2
3
4
5
6
7
8
9
10
11
12
13
14
15
16
17
18
19
20
21
# HELM
Helm 是 Kubernetes 的包管理工具,类似于 Linux 世界里的 apt 或 yum。 它把一组 Kubernetes 资源(YAML 文件)打包成一个 Chart,方便安装、升级、回滚和管理。
Helm 是官方提供的类似于 YUM 的包管理器,是部署环境的流程封装。Helm 有两个重要的概念:chart 和 release
- Chart:是创建一个应用的信息集合,包括各种 Kubernetes 对象的配置模板、参数定义、依赖关系、文档说明等。chart 是应用部署的自包含逻辑单元。可以将 chart 想象成 apt、yum 中的软件安装包
- Release:是 chart 的运行实例,代表了一个正在运行的应用。当 chart 被安装到 Kubernetes 集群,就生成一个 release。chart 能够多次安装到同一个集群,每次安装都是一个 release
- Helm cli:helm 客户端组件,负责和 kubernetes apiS 通信
- Repository:用于发布和存储 Chart 的仓库
# 安装
curl -fsSL -o get_helm.sh https://raw.githubusercontent.com/helm/helm/main/scripts/get-helm-3
chmod 700 get_helm.sh
./get_helm.sh
helm version
2
3
4
初始化
当您已经安装好了Helm之后,您可以添加一个chart 仓库。从 Artifact Hub (opens new window) 中查找有效的Helm chart仓库
helm repo add bitnami https://charts.bitnami.com/bitnami
当添加完成,您将可以看到可以被您安装的 charts 列表:
helm search repo bitnami
安装 chart 示例
helm repo update  # 确定我们可以拿到最新的 charts 列表
helm show values bitnami/apache  # 显示可配置参数,预览默认值
helm install bitnami/apache --generate-name # 自动生成名字
helm install apache-1612624192 bitnami/apache # 指定名字
helm ls
helm show chart bitnami/apache # chart 的基本信息
helm show all bitnami/apache # chart 的所有信息
2
3
4
5
6
7
安装资源顺序
Namespace > NetworkPolicy > ResourceQuota > LimitRange > PodSecurityPolicy > PodDisruptionBudget > ServiceAccount > Secret > SecretList > ConfigMap > StorageClass
PersistentVolume > PersistentVolumeClaim > CustomResourceDefinition
> ClusterRole
ClusterRoleList > ClusterRoleBinding > ClusterRoleBindingList > Role
> RoleList
RoleBinding > RoleBindingList > Service > DaemonSet > Pod >
ReplicationController > ReplicaSet > Deployment >
HorizontalPodAutoscaler > StatefulSet > Job > CronJob > Ingress >
APIService
2
3
4
5
6
7
8
9
卸载一个版本
helm uninstall apache-1758962180 # 该命令会从Kubernetes卸载 apache-1758962180,它将删除和该版本相关的所有相关资源(service、deployment、 pod等等)甚至版本历史
 --keep-history # 选项, Helm 将会保存版本历史

helm status apache-1612624192 # 查看该版本的信息
2
3
4
# 用于在 Helm Hub(https://hub.helm.sh)上搜索 Helm charts
helm search hub wordpress
# 用于在配置的 Helm 仓库中搜索 Helm charts,~/.config/helm/repositories.yaml 中被定义持久化
helm search repo wordpress
# Helm 搜索使用模糊字符串匹配算法,所以你可以只输入名字的一部分
2
3
4
5
安装前自定义 chart
helm show values bitnami/apache # 查看 chart 中的可配置选项
# 使用 YAML 格式的文件覆盖上述任意配置项,并在安装过程中使用该文件
vi values.yaml
service:
 type: NodePort

helm install -f values.yaml bitnami/apache --generate-name
2
3
4
5
6
7
安装过程中有两种方式传递配置数据
--values (或 -f ):使用 YAML 文件覆盖配置。可以指定多次,优先使用最右边的文件

--set :通过命令行的方式对指定项进行覆盖

如果同时使用两种方式,则 --set 中的值会被合并到 --values 中,但是 --set 中的值优先级更高。
在 --set 中覆盖的内容会被被保存在 ConfigMap 中。可以通过 helm get values <release-name> 来
查看指定 release 中 --set 设置的值。也可以通过运行 helm upgrade 并指定 --reset-values 字段来
清除 --set 中设置的值
2
3
4
5
6
7
8
更多安装方法
- helm install 命令可以从多个来源进行安装:
- chart 的仓库(如上所述)
- 本地 chart 压缩包( helm install foo foo-0.1.1.tgz )
- 解压后的 chart 目录( helm install foo path/to/foo )
- 完整的 URL( helm install foo https://example.com/charts/foo-1.2.3.tgz )
'helm upgrade' 和 'helm rollback':升级 release 和失败时恢复 当你想升级到 chart 的新版本,或是修改 release 的配置,你可以使用 helm upgrade 命令。Helm 会 尝试执行最小侵入式升级。即它只会更新自上次发布以来发生了更改的内容
helm upgrade -f clusterip.yaml apache-1758962840 bitnami/apache
在上面的例子中, apache-1758962840 这个 release 使用相同的 chart 进行升级,但是使用了一个新的YAML 文件:
service:
 type: ClusterIP
2
我们可以使用 helm get values 命令来看看配置值是否真的生效了
helm get values apache-1758962840
现在,假如在一次发布过程中,发生了不符合预期的事情,也很容易通过 helm rollback [RELEASE] [REVISION] 命令回滚到之前的发布版本
helm rollback apache-1758962840 1
上面这条命令将我们的 apache-1758962840 回滚到了它最初的版本。release 版本其实是一个增量修订(revision)。 每当发生了一次安装、升级或回滚操作,revision 的值就会加1。第一次 revision 的值永远是1。我们可以使用 helm history [RELEASE] 命令来查看一个特定 release 的修订版本号
helm history apache-1758962840
创建一个自己的 Chart
# 1、创建一个模板
helm create myapp
# 2、删除不用的文件
rm -rf templates/* values.yaml
# 3、编写 template 下的 service 和 deployment 资源清单
2
3
4
5
vim templates/nodePort.yaml
apiVersion: v1
kind: Service
metadata:
 labels:
  app: myapp-test
 name: myapp-test-20250927-svc
spec:
 ports:
  - name: 80-80
    port: 80
    protocol: TCP
    targetPort: 80
    nodePort: 31111
 selector:
   app: myapp-test
 type: NodePort
2
3
4
5
6
7
8
9
10
11
12
13
14
15
16
vim templates/deployment.yaml
apiVersion: apps/v1
kind: Deployment
metadata:
 labels:
   app: myapp-test
 name: myapp-test-202401110926-deploy
spec:
 replicas: 5
 selector:
   matchLabels:
     app: myapp-test
 template:
   metadata:
     labels:
       app: myapp-test
   spec:
     containers:
      - image: wangyanglinux/myapp:v1.0
        name: myapp
2
3
4
5
6
7
8
9
10
11
12
13
14
15
16
17
18
19
# 发布部署
helm install myapp myapp/
2
# 关键功能
vim templates/NOTES.txt
1、这是一个测试的 myapp chart
2、myapp release 名字:myapp-test-{{ now | date "20060102030405" }}-deploy
3、service 名字:myapp-test-{{ now | date "20060102030405" }}-svc
-----------------------------------------------------------------
2
3
4
vim templates/deployment.yaml
apiVersion: apps/v1
kind: Deployment
metadata:
 labels:
   app: myapp-test
 name: myapp-test-{{ now | date "20060102030405" }}-deploy
spec:
 replicas: {{ .Values.replicaCount }}
 selector:
   matchLabels:
     app: myapp-test
 template:
   metadata:
     labels:
       app: myapp-test
   spec:
     containers:
      - image: {{ .Values.image.repository }}:{{ .Values.image.tag }}
        name: myapp
2
3
4
5
6
7
8
9
10
11
12
13
14
15
16
17
18
19
vim templates/service.yaml
apiVersion: v1
kind: Service
metadata:
 labels:
   app: myapp-test
 name: myapp-test-{{ now | date "20060102030405" }}-svc
spec:
 ports:
  - name: 80-80
    port: 80
    protocol: TCP
    targetPort: 80
    {{- if eq .Values.service.type "NodePort" }}
    nodePort: {{.Values.service.nodeport }}
    {{- end }}
 selector:
   app: myapp-test
 type: {{ .Values.service.type | quote }}
2
3
4
5
6
7
8
9
10
11
12
13
14
15
16
17
18
vim values.yaml
# Default values for myapp.
# This is a YAML-formatted file.
# Declare variables to be passed into your templates.
replicaCount: 5
image:
 repository: wangyanglinux/myapp
 tag: "v1.0"
service:
 type: NodePort
 nodeport: 32321
2
3
4
5
6
7
8
9
10
# ingress-nginx
Ingress-NGINX 是 Kubernetes 官方维护的 Ingress Controller,基于 NGINX 反向代理。
它的作用是:
把集群外部的请求(HTTP/HTTPS)转发到集群内部的 Service/Pod;
支持域名、路径、TLS、流量控制等功能。
helm repo add ingress-nginx https://kubernetes.github.io/ingress-nginx
helm repo update
helm pull ingress-nginx/ingress-nginx
tar -zxvf ingress-nginx-4.13.2.tgz
修改 values.yaml文件的说明:
修改 hostNetwork的值为 true
dnsPolicy的值改为:ClusterFirstWithHostNet
kind类型更改为:DaemonSet
关闭所有镜像的 digest
ingressClassResource.default=true
2
3
4
5
6
7
8
9
10
kubectl create ns ingress
helm install ingress-nginx -n ingress ./ingress-nginx -f ingress-nginx/values.yaml
kubectl get pod -n ingress -o wide
2
3
# Ingress HTTP 代理访问
apiVersion: apps/v1
kind: Deployment
metadata:
 name: ingress-httpproxy-www1
spec:
 replicas: 2
 selector:
   matchLabels:
     hostname: www1
 template:
   metadata:
     labels:
       hostname: www1
   spec:
     containers:
     - name: nginx
       image: wangyanglinux/myapp:v1.0
       imagePullPolicy: IfNotPresent
       ports:
       - containerPort: 80
---
apiVersion: v1
kind: Service
metadata:
 name: ingress-httpproxy-www1
spec:
 ports:
 - port: 80
   targetPort: 80
   protocol: TCP
 selector:
   hostname: www1
---
apiVersion: networking.k8s.io/v1
kind: Ingress
metadata:
 name: ingress-httpproxy-www1
spec:
 ingressClassName: nginx
 rules:
 - host: www.zmyz123456.com
   http:
     paths:
     - path: /
       pathType: Prefix
       backend:
         service:
           name: ingress-httpproxy-www1
           port:
             number: 80
2
3
4
5
6
7
8
9
10
11
12
13
14
15
16
17
18
19
20
21
22
23
24
25
26
27
28
29
30
31
32
33
34
35
36
37
38
39
40
41
42
43
44
45
46
47
48
49
50
# Ingress HTTPS 代理访问
openssl req -x509 -sha256 -nodes -days 365 -newkey rsa:2048 -keyout tls.key -out tls.crt -subj "/CN=nginxsvc/O=nginxsvc"
kubectl create secret tls ingress-nginx-tls  --key tls.key --cert tls.crt
2
apiVersion: apps/v1
kind: Deployment
metadata:
 name: ingress-httpproxy-ssl
spec:
 replicas: 2
 selector:
   matchLabels:
     hostname: ssl
 template:
   metadata:
     labels:
       hostname: ssl
   spec:
     containers:
     - name: nginx
       image: wangyanglinux/myapp:v3.0
       imagePullPolicy: IfNotPresent
       ports:
       - containerPort: 80
---
apiVersion: v1
kind: Service
metadata:
 name: ingress-httpproxy-ssl
spec:
 ports:
 - port: 80
   targetPort: 80
   protocol: TCP
 selector:
   hostname: ssl
2
3
4
5
6
7
8
9
10
11
12
13
14
15
16
17
18
19
20
21
22
23
24
25
26
27
28
29
30
31
32
apiVersion: networking.k8s.io/v1
kind: Ingress
metadata:
 name: ingress-httpproxy-ssl
 namespace: default
 annotations:
   nginx.ingress.kubernetes.io/ssl-redirect: "true"
spec:
 ingressClassName: nginx
 rules:
 - host: ssl.xinxianghf.com
   http:
     paths:
     - path: /
       pathType: Prefix
       backend:
         service:
           name: ingress-httpproxy-ssl
           port:
             number: 80
 tls:
 - hosts:
   - ssl.xinxianghf.com
   secretName: ingress-nginx-tls
2
3
4
5
6
7
8
9
10
11
12
13
14
15
16
17
18
19
20
21
22
23
24
# Ingress BasicAuth 代理
http 认证文件创建
apt -y install httpd-tools
htpasswd -c auth zsan
kubectl create secret generic ingress-basic-auth --from-file=auth
2
3
apiVersion: networking.k8s.io/v1
kind: Ingress
metadata:
 name: ingress-with-auth
 annotations:
   nginx.ingress.kubernetes.io/auth-type: basic
   nginx.ingress.kubernetes.io/auth-secret: ingress-basic-auth
   nginx.ingress.kubernetes.io/auth-realm: 'Authentication Required - zsan'
spec:
 ingressClassName: nginx
 rules:
 - host: auth.zsan.com
   http:
     paths:
     - path: /
       pathType: ImplementationSpecific
       backend:
         service:
           name: ingress-httpproxy-auth
           port:
             number: 80
2
3
4
5
6
7
8
9
10
11
12
13
14
15
16
17
18
19
20
21
# Ingress-nginx 域名重定向
作用: 重定向是指服务器向客户端发出一个新的URL,让客户端进行新的请求。客户端会收到一个HTTP 3xx状态码,然后根据其中的重定向地址进行新的请求。这意味着客户端会知道发生了重定向,它会发起新的请求。 示例: 比如你有一个网站的旧地址是http://example.com,但是你希望所有的请求都转发到https://example.com,这时你就可以使用重定向将所有的HTTP请求重定向到HTTPS。
apiVersion: networking.k8s.io/v1
kind: Ingress
metadata:
 name: redirect.zsan.com
 namespace: default
 annotations:
   kubernetes.io/ingress.class: "nginx"
   nginx.ingress.kubernetes.io/permanent-redirect: https://www.baidu.com
   nginx.ingress.kubernetes.io/permanent-redirect-code: '301'
spec:
 ingressClassName: "nginx"
 rules:
  - host: redirect.zsan.com
    http:
2
3
4
5
6
7
8
9
10
11
12
13
14
# Ingress-nginx 重写
作用: 重写是指修改请求的路径,但是客户端不会察觉到这个变化,它仅在服务器内部发生。在Kubernetes 中,可以通过 Ingress 的注解来配置重写规则。 示例: 比如你有一个服务部署在 /v1路径下,但是你希望用户访问时不需要输入 /v1,那么你可以使用重写将请求从根路径 /重写到 /v1。
apiVersion: networking.k8s.io/v1
kind: Ingress
metadata:
 name: rew.zsan.com
 namespace: default
 annotations:
   nginx.ingress.kubernetes.io/rewrite-target: /$2
spec:
 ingressClassName: "nginx"
 rules:
 - host: rew.zsan.com
   http:
     paths:
     - path: /api(/|$)(.*)
       pathType: ImplementationSpecific
       backend:
         service:
           name: www1svc
           port:
             number: 80
2
3
4
5
6
7
8
9
10
11
12
13
14
15
16
17
18
19
20
重写和重定向区别
影响范围: Rewrite 只在服务器内部修改请求路径,不会影响到客户端,而 Redirect 则会向客户端发送一个新的 URL,让客户端发起新的请求。
状态码: Rewrite 不涉及状态码的改变,而 Redirect 会向客户端发送一个重定向的 HTTP 状态码(例如 301 永久重定向、302 临时重定向等)。
可见性: Rewrite 对于客户端来说是透明的,而 Redirect 则会告知客户端发生了重定向。
在选择使用 Rewrite 还是 Redirect 时,需要根据具体的需求来决定。如果你希望在不修改客户端请求的情况下修改路径,那么使用 Rewrite;如果你希望客户端知道发生了重定向,并且根据新的 URL 进行新的请求,那么使用 Redirect。
# Ingress-nginx 默认错误后端
# 修改values.yaml
defaultBackend:
 enabled: true
 name: defaultbackend
 image:
   registry: docker.io
   image: wangyanglinux/tools
   tag: "errweb1.0"
 port: 80
2
3
4
5
6
7
8
9
# Ingress-nginx 定制错误后端
apiVersion: apps/v1
kind: Deployment
metadata:
 labels:
   app: errcode
 name: errcode
spec:
 replicas: 1
 selector:
   matchLabels:
     app: errcode
 template:
  metadata:
    labels:
      app: errcode
  spec:
    containers:
    - image: wangyanglinux/tools:errweb1.0
      name: tools
---
apiVersion: v1
kind: Service
metadata:
 labels:
   app: errcode
 name: errcode
spec:
 ports:
 - name: 80-80
   port: 80
   protocol: TCP
   targetPort: 80
 selector:
   app: errcode
 type: ClusterIP
---
apiVersion: apps/v1
kind: Deployment
metadata:
 labels:
   app: errtest
 name: errtest
spec:
 replicas: 1
 selector:
   matchLabels:
     app: errtest
 template:
   metadata:
     labels:
       app: errtest
   spec:
     containers:
     - image: wangyanglinux/myapp:v1.0
       name: tools
---
apiVersion: v1
kind: Service
metadata:
 labels:
   app: errtest
 name: errtest
spec:
 ports:
 - name: 80-80
   port: 80
   protocol: TCP
   targetPort: 80
 selector:
   app: errtest
 type: ClusterIP
---
apiVersion: networking.k8s.io/v1
kind: Ingress
metadata:
 name: err.zsan.com
 namespace: default
 annotations:
   nginx.ingress.kubernetes.io/default-backend: 'errcode'
   nginx.ingress.kubernetes.io/custom-http-errors: "404,415"
spec:
 rules:
 - host: err.zsan.com
   http:
     paths:
     - path: /
       pathType: Prefix
       backend:
         service:
           name: errtest
           port:
             number: 80
2
3
4
5
6
7
8
9
10
11
12
13
14
15
16
17
18
19
20
21
22
23
24
25
26
27
28
29
30
31
32
33
34
35
36
37
38
39
40
41
42
43
44
45
46
47
48
49
50
51
52
53
54
55
56
57
58
59
60
61
62
63
64
65
66
67
68
69
70
71
72
73
74
75
76
77
78
79
80
81
82
83
84
85
86
87
88
89
90
91
92
# Ingress-nginx snippet
kubectl edit cm ingress-nginx-controller -n ingress
 data:
   allow-snippet-annotations: "true"
2
3
apiVersion: apps/v1
kind: Deployment
metadata:
 labels:
   app: snippet
 name: snippet
spec:
 replicas: 1
 selector:
   matchLabels:
     app: snippet
 template:
   metadata:
     labels:
       app: snippet
   spec:
     containers:
     - image: wangyanglinux/myapp:v1.0
       name: tools
---
apiVersion: v1
kind: Service
metadata:
 labels:
   app: snippet
 name: snippet
spec:
 ports:
 - name: 80-80
   port: 80
   protocol: TCP
   targetPort: 80
 selector:
   app: snippet
 type: ClusterIP
---
apiVersion: networking.k8s.io/v1
kind: Ingress
metadata:
 name: snippet.zsan.com
 namespace: default
 annotations:
   nginx.ingress.kubernetes.io/server-snippet: |
     set $agentflag 0;
     if ($http_user_agent ~* "(Android|IPhone)") {
       set $agentflag 1;
     }
     if ($agentflag = 1) {
       return 302 http://www.baidu.com;
     }
spec:
 rules:
 - host: snippet.zsan.com
   http:
     paths:
     - path: /
       pathType: Prefix
       backend:
         service:
           name: snippet
           port:
             number: 80
2
3
4
5
6
7
8
9
10
11
12
13
14
15
16
17
18
19
20
21
22
23
24
25
26
27
28
29
30
31
32
33
34
35
36
37
38
39
40
41
42
43
44
45
46
47
48
49
50
51
52
53
54
55
56
57
58
59
60
61
62
curl snippet.zsan.com
curl snippet.zsan.com -H 'User-Agent: Android'  -I
2
# Ingress-nginx 黑白名单
黑白名单配置可以用configmap或annotations配置
- 黑名单可以使用 ConfigMap 去配置
- 白名单建议使用 Annotations 去配置
# configmap 添加黑名单
kubectl edit cm ingress-nginx-controller -n ingress
 data:
   allow-snippet-annotations: "true"
   block-cidrs: 192.168.10.12
2
3
4
apiVersion: apps/v1
kind: Deployment
metadata:
 labels:
   app: test
 name: test-deploy
spec:
 replicas: 1
 selector:
   matchLabels:
     app: test
 template:
   metadata:
     labels:
       app: test
   spec:
     containers:
     - image: wangyanglinux/myapp:v1.0
       name: myapp
---
apiVersion: v1
kind: Service
metadata:
 labels:
   app: test
 name: test-svc
spec:
 ports:
 - name: 80-80
   port: 80
   protocol: TCP
   targetPort: 80
 selector:
   app: test
 type: ClusterIP
---
apiVersion: networking.k8s.io/v1
kind: Ingress
metadata:
 name: test.zsan.com
spec:
 rules:
 - host: test.zsan.com
   http:
     paths:
     - path: /
       pathType: Prefix
       backend:
         service:
           name: test-svc
           port:
             number: 80
2
3
4
5
6
7
8
9
10
11
12
13
14
15
16
17
18
19
20
21
22
23
24
25
26
27
28
29
30
31
32
33
34
35
36
37
38
39
40
41
42
43
44
45
46
47
48
49
50
51
52
Annotations 添加黑名单
apiVersion: apps/v1
kind: Deployment
metadata:
 labels:
   app: black
 name: black-deploy
spec:
 replicas: 1
 selector:
   matchLabels:
     app: black
 template:
   metadata:
     labels:
       app: black
   spec:
     containers:
     - image: wangyanglinux/myapp:v1.0
       name: myapp
---
apiVersion: v1
kind: Service
metadata:
 labels:
   app: black
 name: black-svc
spec:
 ports:
 - name: 80-80
   port: 80
   protocol: TCP
   targetPort: 80
 selector:
   app: black
 type: ClusterIP
---
apiVersion: networking.k8s.io/v1
kind: Ingress
metadata:
 annotations:
   nginx.ingress.kubernetes.io/server-snippet: |-
     deny 192.168.10.11;
     allow all;
 name: black.zsan.com
spec:
 rules:
 - host: black.zsan.com
   http:
     paths:
     - pathType: Prefix
       backend:
         service:
           name: black-svc
           port:
             number: 80
       path: /
2
3
4
5
6
7
8
9
10
11
12
13
14
15
16
17
18
19
20
21
22
23
24
25
26
27
28
29
30
31
32
33
34
35
36
37
38
39
40
41
42
43
44
45
46
47
48
49
50
51
52
53
54
55
56
Configmap 设置白名单
kubectl edit cm ingress-nginx-controller -n ingress
 apiVersion: v1
 data:
   allow-snippet-annotations: "true"
   whitelist-source-range: 192.168.10.11
2
3
4
5
apiVersion: apps/v1
kind: Deployment
metadata:
 labels:
   app: test
 name: test-deploy
spec:
 replicas: 1
 selector:
   matchLabels:
     app: test
 template:
   metadata:
     labels:
       app: test
   spec:
     containers:
     - image: wangyanglinux/myapp:v1.0
       name: myapp
---
apiVersion: v1
kind: Service
metadata:
 labels:
   app: test
 name: test-svc
spec:
 ports:
 - name: 80-80
   port: 80
   protocol: TCP
   targetPort: 80
 selector:
   app: test
 type: ClusterIP
---
apiVersion: networking.k8s.io/v1
kind: Ingress
metadata:
 name: test.zsan.com
spec:
 rules:
 - host: test.zsan.com
   http:
     paths:
     - path: /
       pathType: Prefix
       backend:
         service:
           name: test-svc
           port:
             number: 80
2
3
4
5
6
7
8
9
10
11
12
13
14
15
16
17
18
19
20
21
22
23
24
25
26
27
28
29
30
31
32
33
34
35
36
37
38
39
40
41
42
43
44
45
46
47
48
49
50
51
52
annotations 添加白名单
apiVersion: apps/v1
kind: Deployment
metadata:
 labels:
   app: white
 name: white-deploy
spec:
 replicas: 1
 selector:
   matchLabels:
     app: white
 template:
   metadata:
     labels:
       app: white
   spec:
     containers:
     - image: wangyanglinux/myapp:v1.0
       name: myapp
---
apiVersion: v1
kind: Service
metadata:
 labels:
   app: white
 name: white-svc
spec:
 ports:
 - name: 80-80
   port: 80
   protocol: TCP
   targetPort: 80
 selector:
   app: white
 type: ClusterIP
---
apiVersion: networking.k8s.io/v1
kind: Ingress
metadata:
 annotations:
   nginx.ingress.kubernetes.io/whitelist-source-range: 192.168.10.11
 name: white.zsan.com
spec:
 rules:
 - host: white.zsan.com
   http:
     paths:
     - path: /
       pathType: Prefix
       backend:
         service:
           name: white-svc
           port:
             number: 80
2
3
4
5
6
7
8
9
10
11
12
13
14
15
16
17
18
19
20
21
22
23
24
25
26
27
28
29
30
31
32
33
34
35
36
37
38
39
40
41
42
43
44
45
46
47
48
49
50
51
52
53
54
# Ingress-nginx 速率限制
apiVersion: apps/v1
kind: Deployment
metadata:
 labels:
   app: speed
 name: speed-deploy
spec:
 replicas: 1
 selector:
   matchLabels:
     app: speed
 template:
   metadata:
     labels:
       app: speed
   spec:
     containers:
     - image: wangyanglinux/myapp:v1.0
       name: myapp
---
apiVersion: v1
kind: Service
metadata:
 labels:
   app: speed
 name: speed-svc
spec:
 ports:
 - name: 80-80
   port: 80
   protocol: TCP
   targetPort: 80
 selector:
   app: speed
 type: ClusterIP
---
apiVersion: networking.k8s.io/v1
kind: Ingress
metadata:
 name: speed.zsan.com
 namespace: default
spec:
 rules:
 - host: speed.zsan.com
   http:
     paths:
     - pathType: Prefix
       path: "/"
       backend:
         service:
           name: speed-svc
           port:
             number: 80
2
3
4
5
6
7
8
9
10
11
12
13
14
15
16
17
18
19
20
21
22
23
24
25
26
27
28
29
30
31
32
33
34
35
36
37
38
39
40
41
42
43
44
45
46
47
48
49
50
51
52
53
ab -c 10 -n 100 http://speed.zsan.com/ | grep requests
apiVersion: networking.k8s.io/v1
kind: Ingress
metadata:
 name: speed.zsan.com
 namespace: default
 annotations:
   nginx.ingress.kubernetes.io/limit-connections: "1"
spec:
 rules:
 - host: speed.zsan.com
   http:
     paths:
     - pathType: Prefix
       path: "/"
       backend:
         service:
           name: speed-svc
           port:
             number: 80
2
3
4
5
6
7
8
9
10
11
12
13
14
15
16
17
18
19
Ingress-nginx 灰度发布
apiVersion: apps/v1
kind: Deployment
metadata:
 labels:
   app: v1
 name: v1-deploy
spec:
 replicas: 10
 selector:
   matchLabels:
     app: v1
 template:
   metadata:
     labels:
       app: v1
   spec:
     containers:
     - image: wangyanglinux/myapp:v1.0
       name: myapp
---
apiVersion: v1
kind: Service
metadata:
 labels:
   app: v1
 name: v1-svc
spec:
 ports:
 - name: 80-80
   port: 80
   protocol: TCP
   targetPort: 80
 selector:
   app: v1
 type: ClusterIP
---
apiVersion: networking.k8s.io/v1
kind: Ingress
metadata:
 name: v1.zsan.com
 namespace: default
spec:
 rules:
 - host: svc.zsan.com
   http:
     paths:
     - pathType: Prefix
       path: "/"
       backend:
         service:
           name: v1-svc
           port:
             number: 80
2
3
4
5
6
7
8
9
10
11
12
13
14
15
16
17
18
19
20
21
22
23
24
25
26
27
28
29
30
31
32
33
34
35
36
37
38
39
40
41
42
43
44
45
46
47
48
49
50
51
52
53
apiVersion: apps/v1
kind: Deployment
metadata:
 labels:
   app: v2
 name: v2-deploy
spec:
 replicas: 10
 selector:
   matchLabels:
     app: v2
 template:
   metadata:
     labels:
       app: v2
   spec:
     containers:
     - image: wangyanglinux/myapp:v2.0
       name: myapp
---
apiVersion: v1
kind: Service
metadata:
 labels:
   app: v2
 name: v2-svc
spec:
 ports:
 - name: 80-80
   port: 80
   protocol: TCP
   targetPort: 80
 selector:
   app: v2
 type: ClusterIP
---
apiVersion: networking.k8s.io/v1
kind: Ingress
metadata:
 name: v2.zsan.com
 namespace: default
 annotations:
   nginx.ingress.kubernetes.io/canary: "true"
   nginx.ingress.kubernetes.io/canary-weight: "10"
spec:
 rules:
 - host: svc.zsan.com
   http:
     paths:
     - pathType: Prefix
       path: "/"
       backend:
         service:
           name: v2-svc
           port:
             number: 80
2
3
4
5
6
7
8
9
10
11
12
13
14
15
16
17
18
19
20
21
22
23
24
25
26
27
28
29
30
31
32
33
34
35
36
37
38
39
40
41
42
43
44
45
46
47
48
49
50
51
52
53
54
55
56
for i in {1..100};do curl svc.xinxianghf.com >> sum;done
cat sum | sort | uniq -c
2
# ingress-nginx 代理后端 HTTPS 服务
apiVersion: apps/v1
kind: Deployment
metadata:
 labels:
   app: proxyhttps
 name: proxyhttps-deploy
spec:
 replicas: 1
 selector:
   matchLabels:
     app: proxyhttps
 template:
   metadata:
     labels:
       app: proxyhttps
   spec:
     containers:
     - image: wangyanglinux/tools:httpsv1
       name: myapp
---
apiVersion: v1
kind: Service
metadata:
 labels:
   app: proxyhttps
 name: proxyhttps-svc
spec:
 ports:
 - name: 443-443
   port: 443
   protocol: TCP
   targetPort: 443
 selector:
   app: proxyhttps
 type: ClusterIP
apiVersion: networking.k8s.io/v1
kind: Ingress
metadata:
 annotations:
   nginx.ingress.kubernetes.io/backend-protocol: HTTPS
 name: proxyhttps.zsan.com
 namespace: default
spec:
 rules:
 - host: proxyhttps.zsan.com
   http:
     paths:
     - backend:
         service:
           name: proxyhttps-svc
           port:
             number: 443
       path: /
       pathType: ImplementationSpecific
2
3
4
5
6
7
8
9
10
11
12
13
14
15
16
17
18
19
20
21
22
23
24
25
26
27
28
29
30
31
32
33
34
35
36
37
38
39
40
41
42
43
44
45
46
47
48
49
50
51
52
53
54
# ingress-nginx 四层代理
kubectl edit ds -n ingress ingress-nginx-controller
   spec:
     containers:
      - args:
        - /nginx-ingress-controller
        - --tcp-services-configmap=$(POD_NAMESPACE)/nginx-ingress-tcp-configmap
2
3
4
5
6
apiVersion: v1
kind: ConfigMap
metadata:
 name: nginx-ingress-tcp-configmap
 namespace: ingress
data:
 "9000": "default/proxyhttps-svc:443"
2
3
4
5
6
7
apiVersion: apps/v1
kind: Deployment
metadata:
 labels:
   app: proxyhttps
 name: proxyhttps-deploy
spec:
 replicas: 1
 selector:
   matchLabels:
     app: proxyhttps
 template:
   metadata:
     labels:
       app: proxyhttps
   spec:
     containers:
     - image: wangyanglinux/tools:httpsv1
       name: myapp
---
apiVersion: v1
kind: Service
metadata:
 labels:
   app: proxyhttps
 name: proxyhttps-svc
spec:
 ports:
 - name: 443-443
   port: 443
   protocol: TCP
   targetPort: 443
 selector:
   app: proxyhttps
 type: ClusterIP
2
3
4
5
6
7
8
9
10
11
12
13
14
15
16
17
18
19
20
21
22
23
24
25
26
27
28
29
30
31
32
33
34
35
ingress-nginx链路追踪
https://raw.githubusercontent.com/jaegertracing/jaeger-kubernetes/master/all-inone/jaeger-all-in-one-template.yml
kubectl edit cm ingress-nginx-controller -n ingress
   apiVersion: v1
   data:
     allow-snippet-annotations: "true"
     enable-opentracing: "true"   #开启链路追踪
     jaeger-collector-host: jaeger-agent.default.svc.cluster.local  #链路追踪的
svc名称
   kind: ConfigMap
   metadata:
     name: ingress-nginx-controller
     namespace: ingress-nginx
2
3
4
5
6
7
8
9
10
11